Panasonic DMR-EA18K Dvd Recorder - Multi Language - Page 47
Front Display, Closed Caption, TV Aspect, 3 TV settings for DVD-Video, to select Pan and Scan - banding
 |
UPC - 037988256600
View all Panasonic DMR-EA18K manuals
Add to My Manuals
Save this manual to your list of manuals |
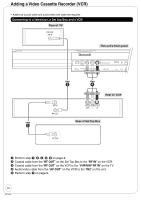
Page 47 highlights
Front Display Changes the brightness of the unit's display. Perform step 1 of "Accessing the Setup Menu" (➔ 42). e, r to select "Display", then q Resets all settings for closed captions After selecting "On" (➔ left, step 5). e, r to select "CC reset", then Setting Menus e, r to select "Front Display", then e, r to select "Bright", "Dim" or "Automatic", then [Automatic] The display turns dark during playback. When the unit is turned off, the unit's display disappears. While using this mode the standby power consumption can be reduced. Closed Caption Choose whether to show closed captions. Perform step 1 of "Accessing the Setup Menu" (➔ 42). e, r to select "Display", then q e, r to select "Closed Caption", then e, r to select "Set", then e, r to select "On", then - Select "Off" if you don't want closed captions. Closed Caption settings After selecting "On" (➔ above, step 5). e, r to select "Analog", then e, r to select the item, then CC1-4 Information related to pictures (Appears at bottom of screen) T1-4 Textual information (Appears over entire screen) TV Aspect This setting allows you to select the type of television connected. Perform step 1 of "Accessing the Setup Menu" (➔ 42). e, r to select "TV Screen", then q e, r to select "TV Aspect", then e, r to select "4:3" or "16:9", then Notes • Aspect 4:3/16:9 4:3 16:9 4:3 standard aspect television 16:9 widescreen television • Digital programs broadcast in the 16:9 aspect ratio may appear with black bands at the edges of the screen on 4:3 aspect televisions. The bands are added to enable the correct aspect ratio to be shown. 4:3 TV settings for DVD-Video You can select how to display the image on the TV when you watch 16:9 images (DVD-Video) on a 4:3 standard aspect TV. Perform step 1 of "Accessing the Setup Menu" (➔ 42). e, r to select "TV Screen", then q e, r to select "4:3 TV settings for DVD-Video", then e, r to select "Pan and Scan (Stretch to fit)" or "Letterbox (Shrink to fit)", then [Pan and Scan (Stretch to fit)] Video recorded for a widescreen is played with the sides cut off if Pan & Scan was specified. If 16:9 software prohibits Pan & Scan, the image will appear in the letterbox style (with black bands above and below the picture) despite the setting here. [Letterbox (Shrink to fit)] Video recorded for a widescreen is played in the letterbox style. 47 RQT9048
-
 1
1 -
2
-
3
-
4
-
5
-
6
-
7
-
8
-
9
-
10
-
11
-
12
-
13
-
14
-
15
-
16
-
17
-
18
-
19
-
20
-
21
-
22
-
23
-
24
-
25
-
26
-
27
-
28
-
29
-
30
-
31
-
32
-
33
-
34
-
35
-
36
-
37
-
38
-
39
-
40
-
41
-
 42
42 -
 43
43 -
 44
44 -
 45
45 -
 46
46 -
 47
47 -
 48
48 -
 49
49 -
 50
50 -
 51
51 -
 52
52 -
53
-
54
-
55
-
56
-
57
-
58
-
59
-
60
-
61
-
62
-
63
-
64
-
65
-
66
-
67
-
68
-
69
-
70
-
71
-
72
-
73
-
74
-
75
-
76
 |
 |
