Panasonic DMR-EA18K Dvd Recorder - Multi Language - Page 33
Change Thumbnail, then, to select Yes
 |
UPC - 037988256600
View all Panasonic DMR-EA18K manuals
Add to My Manuals
Save this manual to your list of manuals |
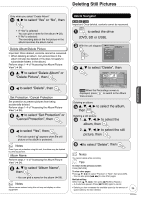
Page 33 highlights
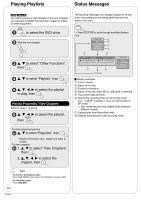
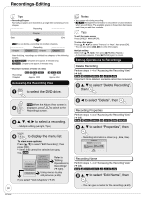
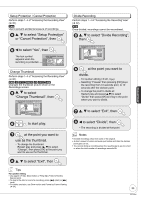
Setup Protection / Cancel Protection Perform steps 1−4 of "Accessing the Recording View" (➔ 32). RAM Use to prevent accidental erasure of recordings. e, r to select "Setup Protection" or "Cancel Protection", then w to select "Yes", then The lock symbol appears when the recording is protected. DIRECT NAVIGATOR Recordings DVD-RAM 07 08 10 10/27 Mon 8 10/27 Mon Change Thumbnail Perform steps 1−4 of "Accessing the Recording View" (➔ 32). RAM -R -R DL -RW(V) +R +R DL +RW Changes the thumbnail picture shown in the Recordings screen. e, r to select "Change Thumbnail", then DIRECT NAVIGATOR Change Thumbnail DVD-RAM A Video B Picture 07 08 08 -Change ***06 End ***06 1. 1. SUN ***06 1. 1. SUN Next -- -- -- Exit 0:00.00 Previous Change Start play and select --:P--a.g--e t0h2e/t0h2umbnail posiNtioenx.t ENTER S SUB MENU Select No. 0 -- 9 to start play. at the point you want to use as the thumbnail. - To change the thumbnail: Restart play and press [e, r] to select "Change", then press [OK] at the point you want to use as the thumbnail. Divide Recording Perform steps 1−4 of "Accessing the Recording View" (➔ 32). RAM Once divided, recordings cannot be recombined. e, r to select "Divide Recording", then DIRECT NAVIGATOR DVD-RAM 07 08 ***06 1. 1. SUN Divide Recording A Video B Picture 08 ***06 Play -- ***06 1. 1. SUN Preview Divide Next -- -- -- Exit Divide Previous --:P--a.g--e 02/02 ENTER S SUB MENU Select 0:00.11 Next No. 0 -- 9 at the point you want to divide. - For quicker editing (➔ left, Tips) - Selecting "Preview" then pressing [OK] plays the recording from 10 seconds prior, to 10 seconds after the division point. - To change the point to divide at: Restart play and press [e,r] to select "Divide" then press [OK] to bring to the point where you want to divide. e, r to select "Exit", then 8 w to select "Divide", then - The recording is divided at that point. Notes • Divided recordings retain the name of the original. • A short amount of video and audio just before and after the division point gets cut out. • You cannot divide a recording when the resulting parts are too short or when the total number of recordings exceeds 99. Advanced Editing 8 e, r to select "Exit", then Tips For quicker editing • Use search (➔ 23), Slow-motion or Time Slip (➔ 24) to find the desired point. • To skip to the start or end of a recording, press [u] (start) or [i] (end). • For better precision, use Slow-motion and Frame-by-Frame Viewing (➔ 24). 33 RQT9048
-
 1
1 -
2
-
3
-
4
-
5
-
6
-
7
-
8
-
9
-
10
-
11
-
12
-
13
-
14
-
15
-
16
-
17
-
18
-
19
-
20
-
21
-
22
-
23
-
24
-
25
-
26
-
27
-
 28
28 -
 29
29 -
 30
30 -
 31
31 -
 32
32 -
 33
33 -
 34
34 -
 35
35 -
 36
36 -
 37
37 -
 38
38 -
39
-
40
-
41
-
42
-
43
-
44
-
45
-
46
-
47
-
48
-
49
-
50
-
51
-
52
-
53
-
54
-
55
-
56
-
57
-
58
-
59
-
60
-
61
-
62
-
63
-
64
-
65
-
66
-
67
-
68
-
69
-
70
-
71
-
72
-
73
-
74
-
75
-
76
 |
 |
