Panasonic HC-X1 Advanced Operating Manual - Page 148
Connecting this unit and an iPad, Settings to be made on the iPad
 |
View all Panasonic HC-X1 manuals
Add to My Manuals
Save this manual to your list of manuals |
Page 148 highlights
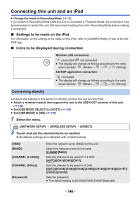
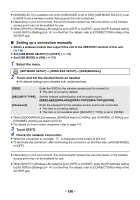
Connecting this unit and an iPad ≥ Change the mode to Recording Mode. (l 33) If you switch to Recording Mode while this unit is connected in Playback Mode, the connection may be terminated to restart this unit. We recommend setting this unit to Recording Mode before making a connection. ∫ Settings to be made on the iPad For information on the settings to be made on the iPad, refer to [CONNECTION] in Help of the AG ROP app. ∫ Icons to be displayed during connection Wireless LAN connection: connected/ not connected ≥ The display will change as follows according to the radio wave intensity: (Weak) # # # (Strong). AG ROP application connection: connected ≥ The display will change as follows according to the radio wave intensity: (Weak) # # # (Strong). Connecting directly Configure the settings in this section to directly connect this unit and the iPad. ≥ Attach a wireless module that support this unit to the USB HOST terminal of this unit. (l 144) ≥ Set [USB MODE SELECT] to [HOST]. (l 199) ≥ Set [USB MODE] to [ON]. (l 199) 1 Select the menu. MENU : [NETWORK SETUP] # [WIRELESS SETUP] # [DIRECT] 2 Touch and set the desired items as needed. ≥ All default settings are indicated with underlined text. [SSID]: [BAND]: [CHANNEL (2.4GHz)]: [CHANNEL (5GHz)]: [Password]: Enter the network name (SSID) for this unit. Select the frequency band to be used. [2.4GHz]/[5GHz] Sets the channel to be used for 2.4 GHz. [AUTO]/[CH1]/[CH6]/[CH11] Sets the channel to be used for 5 GHz. [AUTO]/[CH36]/[CH40]/[CH44]/[CH48]/[CH149]/[CH153]/[CH157]/ [CH161]/[CH165] Sets the password. ≥ The default setting is [01234567890123456789abcdef]. - 148 -
-
 1
1 -
2
-
3
-
4
-
5
-
6
-
7
-
8
-
9
-
10
-
11
-
12
-
13
-
14
-
15
-
16
-
17
-
18
-
19
-
20
-
21
-
22
-
23
-
24
-
25
-
26
-
27
-
28
-
29
-
30
-
31
-
32
-
33
-
34
-
35
-
36
-
37
-
38
-
39
-
40
-
41
-
42
-
43
-
44
-
45
-
46
-
47
-
48
-
49
-
50
-
51
-
52
-
53
-
54
-
55
-
56
-
57
-
58
-
59
-
60
-
61
-
62
-
63
-
64
-
65
-
66
-
67
-
68
-
69
-
70
-
71
-
72
-
73
-
74
-
75
-
76
-
77
-
78
-
79
-
80
-
81
-
82
-
83
-
84
-
85
-
86
-
87
-
88
-
89
-
90
-
91
-
92
-
93
-
94
-
95
-
96
-
97
-
98
-
99
-
100
-
101
-
102
-
103
-
104
-
105
-
106
-
107
-
108
-
109
-
110
-
111
-
112
-
113
-
114
-
115
-
116
-
117
-
118
-
119
-
120
-
121
-
122
-
123
-
124
-
125
-
126
-
127
-
128
-
129
-
130
-
131
-
132
-
133
-
134
-
135
-
136
-
137
-
138
-
139
-
140
-
141
-
142
-
 143
143 -
 144
144 -
 145
145 -
 146
146 -
 147
147 -
 148
148 -
 149
149 -
 150
150 -
 151
151 -
 152
152 -
 153
153 -
154
-
155
-
156
-
157
-
158
-
159
-
160
-
161
-
162
-
163
-
164
-
165
-
166
-
167
-
168
-
169
-
170
-
171
-
172
-
173
-
174
-
175
-
176
-
177
-
178
-
179
-
180
-
181
-
182
-
183
-
184
-
185
-
186
-
187
-
188
-
189
-
190
-
191
-
192
-
193
-
194
-
195
-
196
-
197
-
198
-
199
-
200
-
201
-
202
-
203
-
204
-
205
-
206
-
207
-
208
-
209
-
210
-
211
-
212
-
213
-
214
-
215
-
216
-
217
-
218
-
219
-
220
-
221
-
222
-
223
-
224
-
225
-
226
-
227
-
228
-
229
-
230
-
231
-
232
-
233
-
234
-
235
 |
 |
