Panasonic HC-X1 Advanced Operating Manual - Page 153
Menu, Using the Menu, Scene file
 |
View all Panasonic HC-X1 manuals
Add to My Manuals
Save this manual to your list of manuals |
Page 153 highlights
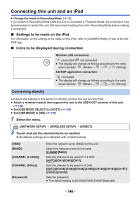
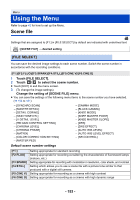
Menu Using the Menu Refer to page 42 for how to set up the Menu. Scene file Settings that are assigned to [F1:] in [FILE SELECT] by default are indicated with underlined text. MENU : [SCENE FILE] # desired setting [FILE SELECT] You can save the desired image settings to each scene number. Switch the scene number in accordance with the recording conditions. [F1:]/[F2:FLUO]/[F3:SPARK]/[F4:STILL]/[F5:CINE V]/[F6:CINE D] 1 Touch [FILE SELECT]. 2 Touch / to select the scene number. ≥ Touch [EXIT] to exit the menu screen. 3 (To change the image settings) Change the setting of [SCENE FILE] menu. ≥ You can save the settings of the following menu items to the scene number you have selected. (l 154 to 161) j [SYNCHRO SCAN] j [MASTER DETAIL] j [DETAIL CORING] j [SKIN TONE DTL] j [V DETAIL LEVEL] j [RB GAIN CONTROL SETTING] j [CHROMA LEVEL] j [CHROMA PHASE] j [MATRIX] j [COLOR CORRECTION SETTING] j [MASTER PED] j [GAMMA MODE] j [BLACK GAMMA] j [KNEE MODE] j [KNEE MASTER POINT] j [KNEE MASTER SLOPE] j [DRS] j [DRS EFFECT] j [AUTO IRIS LEVEL] j [AUTO IRIS LEVEL EFFECT] j [NR CONTROL] Default scene number settings [F1:] [F2:FLUO] [F3:SPARK] [F4:STILL] [F5:CINE V] [F6:CINE D] Setting appropriate for standard recording Setting appropriate for recording considering the characteristic of fluorescent lamps (indoors, etc.) Setting appropriate for recording with modulation in resolution, color shade, and contrast Setting which allows you to use a scene file with a picture tone similar to that produced with a digital still camera. Setting appropriate for recording as a cinema with high contrast Setting appropriate for recording as a cinema with high dynamic range - 153 -
-
 1
1 -
2
-
3
-
4
-
5
-
6
-
7
-
8
-
9
-
10
-
11
-
12
-
13
-
14
-
15
-
16
-
17
-
18
-
19
-
20
-
21
-
22
-
23
-
24
-
25
-
26
-
27
-
28
-
29
-
30
-
31
-
32
-
33
-
34
-
35
-
36
-
37
-
38
-
39
-
40
-
41
-
42
-
43
-
44
-
45
-
46
-
47
-
48
-
49
-
50
-
51
-
52
-
53
-
54
-
55
-
56
-
57
-
58
-
59
-
60
-
61
-
62
-
63
-
64
-
65
-
66
-
67
-
68
-
69
-
70
-
71
-
72
-
73
-
74
-
75
-
76
-
77
-
78
-
79
-
80
-
81
-
82
-
83
-
84
-
85
-
86
-
87
-
88
-
89
-
90
-
91
-
92
-
93
-
94
-
95
-
96
-
97
-
98
-
99
-
100
-
101
-
102
-
103
-
104
-
105
-
106
-
107
-
108
-
109
-
110
-
111
-
112
-
113
-
114
-
115
-
116
-
117
-
118
-
119
-
120
-
121
-
122
-
123
-
124
-
125
-
126
-
127
-
128
-
129
-
130
-
131
-
132
-
133
-
134
-
135
-
136
-
137
-
138
-
139
-
140
-
141
-
142
-
143
-
144
-
145
-
146
-
147
-
 148
148 -
 149
149 -
 150
150 -
 151
151 -
 152
152 -
 153
153 -
 154
154 -
 155
155 -
 156
156 -
 157
157 -
 158
158 -
159
-
160
-
161
-
162
-
163
-
164
-
165
-
166
-
167
-
168
-
169
-
170
-
171
-
172
-
173
-
174
-
175
-
176
-
177
-
178
-
179
-
180
-
181
-
182
-
183
-
184
-
185
-
186
-
187
-
188
-
189
-
190
-
191
-
192
-
193
-
194
-
195
-
196
-
197
-
198
-
199
-
200
-
201
-
202
-
203
-
204
-
205
-
206
-
207
-
208
-
209
-
210
-
211
-
212
-
213
-
214
-
215
-
216
-
217
-
218
-
219
-
220
-
221
-
222
-
223
-
224
-
225
-
226
-
227
-
228
-
229
-
230
-
231
-
232
-
233
-
234
-
235
 |
 |
