Panasonic HC-X1 Advanced Operating Manual - Page 99
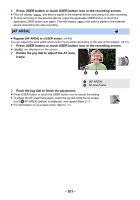
A.IRIS LEVEL], ZEBRA], O.I.S.], Press USER button or touch USER button icon in the recording screen.
 |
View all Panasonic HC-X1 manuals
Add to My Manuals
Save this manual to your list of manuals |
Page 99 highlights
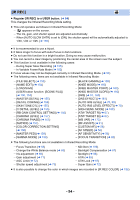
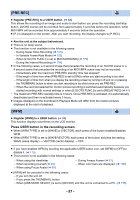
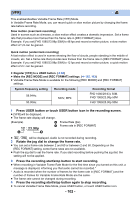
[A.IRIS LEVEL] ≥ Register [A.IRIS LEVEL] to a USER button. (l 84) This enables/disables the Auto Iris Level. ≥ When this item is enabled, the [AUTO IRIS LEVEL EFFECT] setting is applied. (l 70) [ZEBRA] ≥ Register [ZEBRA] to a USER button. (l 84) Press USER button or touch USER button icon in the recording screen. It will switch between the zebra display and the marker display every time the button is pressed. Zebra 1 # Zebra 2* # Marker* # setting canceled * It is not displayed when the [ZEBRA DETECT 2]/[MARKER] is set to [OFF]. (l 193) (When Zebra 1 is set) (When Marker is set) 99% Zebra display: Parts where white saturation (color saturation) is likely to occur (extremely brightly lit or shiny parts) are displayed with diagonal lines (zebra pattern A). Marker display: Displays the luminance level of the center of the screen (luminance display frame B) in %. It makes the adjustment of the brightness of the object easier, by checking the luminance level of the object, when recording same object in different surroundings. ≥ Luminance level C is displayed between 0% and 99%. It will be displayed as 99% when it is over 99%. ≥ This function is not available in the following cases: j When [WFM] is set to [ON] (l 97, 175) j During Freeze Frame (l 91) ≥ You can record an image with little white saturation if you manually adjust the shutter speed or brightness not to display zebra pattern. (l 69, 73) ≥ The zebra pattern does not appear on the images actually recorded. ≥ It is also possible to adjust the level of the zebra pattern to be displayed. (l 193) ≥ It is also possible to change the [ZEBRA MODE] setting to change the display time for the zebra pattern display. (l 175) [O.I.S.] ≥ Register [O.I.S.] to a USER button. (l 84) This enables/disables the Image Stabilizer. (l 52) - 99 -
-
 1
1 -
2
-
3
-
4
-
5
-
6
-
7
-
8
-
9
-
10
-
11
-
12
-
13
-
14
-
15
-
16
-
17
-
18
-
19
-
20
-
21
-
22
-
23
-
24
-
25
-
26
-
27
-
28
-
29
-
30
-
31
-
32
-
33
-
34
-
35
-
36
-
37
-
38
-
39
-
40
-
41
-
42
-
43
-
44
-
45
-
46
-
47
-
48
-
49
-
50
-
51
-
52
-
53
-
54
-
55
-
56
-
57
-
58
-
59
-
60
-
61
-
62
-
63
-
64
-
65
-
66
-
67
-
68
-
69
-
70
-
71
-
72
-
73
-
74
-
75
-
76
-
77
-
78
-
79
-
80
-
81
-
82
-
83
-
84
-
85
-
86
-
87
-
88
-
89
-
90
-
91
-
92
-
93
-
 94
94 -
 95
95 -
 96
96 -
 97
97 -
 98
98 -
 99
99 -
 100
100 -
 101
101 -
 102
102 -
 103
103 -
 104
104 -
105
-
106
-
107
-
108
-
109
-
110
-
111
-
112
-
113
-
114
-
115
-
116
-
117
-
118
-
119
-
120
-
121
-
122
-
123
-
124
-
125
-
126
-
127
-
128
-
129
-
130
-
131
-
132
-
133
-
134
-
135
-
136
-
137
-
138
-
139
-
140
-
141
-
142
-
143
-
144
-
145
-
146
-
147
-
148
-
149
-
150
-
151
-
152
-
153
-
154
-
155
-
156
-
157
-
158
-
159
-
160
-
161
-
162
-
163
-
164
-
165
-
166
-
167
-
168
-
169
-
170
-
171
-
172
-
173
-
174
-
175
-
176
-
177
-
178
-
179
-
180
-
181
-
182
-
183
-
184
-
185
-
186
-
187
-
188
-
189
-
190
-
191
-
192
-
193
-
194
-
195
-
196
-
197
-
198
-
199
-
200
-
201
-
202
-
203
-
204
-
205
-
206
-
207
-
208
-
209
-
210
-
211
-
212
-
213
-
214
-
215
-
216
-
217
-
218
-
219
-
220
-
221
-
222
-
223
-
224
-
225
-
226
-
227
-
228
-
229
-
230
-
231
-
232
-
233
-
234
-
235
 |
 |