Panasonic KX-MB2061 Operating Instructions - Page 78
Programmable Features
 |
View all Panasonic KX-MB2061 manuals
Add to My Manuals
Save this manual to your list of manuals |
Page 78 highlights
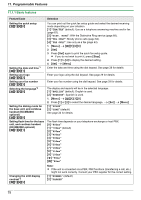
11. Programmable Features 11.1.1 Basic features Feature/Code Setting the quick setup MBNM1NM0NM0N Setting the date and time*1 MBNM1NM0NM1N Setting your logo MBNM1NM0NM2N Setting your fax number MBNM1NM0NM3N Selecting the language*2 MBNM1NM1NM0N Setting the dialing mode for the base unit, and cordless handset (KX-MB2060 optional) MBNM1NM2NM0N Setting flash time for the base unit, and cordless handset (KX-MB2060 optional) MBNM1NM2NM1N Changing the LCD display contrast*2 MBNM1NM4NM5N Selection You can print out the quick fax setup guide and select the desired receiving mode depending on your situation. M1N "TAM/FAX" (default): Use as a telephone answering machine and/or fax (page 62). M2N "DIST. RING": With the Distinctive Ring service (page 68). M3N "TEL ONLY": Mostly phone calls (page 64). M4N "FAX ONLY": Use only as a fax (page 63). 1. MMenuN A MBNM1NM0NM0N 2. MSetN 3. Press MSetN again to print the quick fax setup guide. R If you do not wish to print it, press MStopN. 4. Press M1N to M4N to display the desired setting. 5. MSetN A MMenuN Enter the date and time using the dial keypad. See page 28 for details. Enter your logo using the dial keypad. See page 29 for details. Enter your fax number using the dial keypad. See page 29 for details. The display and reports will be in the selected language. M1N "ENGLISH" (default): English is used. M2N "SPANISH": Spanish is used. 1. MMenuN A MBNM1NM1NM0N 2. Press M1N or M2N to select the desired language. A MSetN A MMenuN M1N "PULSE" M2N "TONE" (default) See page 24 for details. The flash time depends on your telephone exchange or host PBX. M0N "900ms" M1N "700ms" (default) M2N "600ms" M3N "400ms" M4N "300ms" M5N "250ms" M6N "200ms" M7N "160ms" M8N "110ms" M9N "100ms" MGN "90ms" MBN "80ms" Note: R If the unit is connected via a PBX, PBX functions (transferring a call, etc.) might not work correctly. Consult your PBX supplier for the correct setting. M1N "NORMAL" (default) M2N "DARKER" 78
-
 1
1 -
2
-
3
-
4
-
5
-
6
-
7
-
8
-
9
-
10
-
11
-
12
-
13
-
14
-
15
-
16
-
17
-
18
-
19
-
20
-
21
-
22
-
23
-
24
-
25
-
26
-
27
-
28
-
29
-
30
-
31
-
32
-
33
-
34
-
35
-
36
-
37
-
38
-
39
-
40
-
41
-
42
-
43
-
44
-
45
-
46
-
47
-
48
-
49
-
50
-
51
-
52
-
53
-
54
-
55
-
56
-
57
-
58
-
59
-
60
-
61
-
62
-
63
-
64
-
65
-
66
-
67
-
68
-
69
-
70
-
71
-
72
-
 73
73 -
 74
74 -
 75
75 -
 76
76 -
 77
77 -
 78
78 -
 79
79 -
 80
80 -
 81
81 -
 82
82 -
 83
83 -
84
-
85
-
86
-
87
-
88
-
89
-
90
-
91
-
92
-
93
-
94
-
95
-
96
-
97
-
98
-
99
-
100
-
101
-
102
-
103
-
104
-
105
-
106
-
107
-
108
-
109
-
110
-
111
-
112
-
113
-
114
-
115
-
116
-
117
-
118
-
119
-
120
-
121
-
122
-
123
-
124
-
125
-
126
-
127
-
128
-
129
-
130
-
131
-
132
-
133
-
134
-
135
-
136
-
137
-
138
-
139
-
140
-
141
-
142
-
143
-
144
-
145
-
146
-
147
-
148
-
149
-
150
-
151
-
152
-
153
-
154
-
155
-
156
-
157
-
158
-
159
-
160
 |
 |
