Philips HDRW720 User manual - Page 28
Adding and clearing TV channels manually, Setting the language, CHANNEL, TV GUIDE, STANDBY - blocked
 |
View all Philips HDRW720 manuals
Add to My Manuals
Save this manual to your list of manuals |
Page 28 highlights
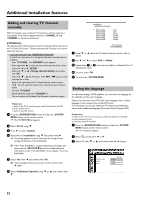
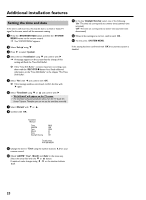
Additional installation features Adding and clearing TV channels manually With this function you can block TV channels on which reception is not possible. They will be skipped when the CHANNEL q and CHANNEL r buttons are selected. ATTENTION ! The allocation (TV channel name to the TV channel) will be done from the TV Guide On Screen ™System automatically. Therefor you cannot select this function. a I can not select the line 'Add/Delete Channels' To switch the channels on or to change the allocation manually proceed as follows: - Press TV GUIDE . The 'LISTINGS' screen appears. - Press repeatedly A to select the menu bar at the top of the screen. - Select with D or C 'SETUP'. - Select with B or A 'Change channel display' and confirm with OK . - Select with B , A the TV-Station. With O , N you can switch one page for or back. - Enter in the right colum the TV channel with the number buttons 0..9 . You can switch the channel on or off with the green function button. - End with TV GUIDE . - Switch off the Recorder with STANDBY m . The new settings will be taken if the Recorder is switched on again. Preparation: •) Switch on the TV set, and if necessary, select the channel for the DVD recorder (channel 3 or 4). •) Switch on the DVD recorder. 1 Press the BROWSER HDD button and then the SYSTEM MENU button on the remote control. P The 'SYSTEM MENU' appears. 2 Select 'Set up' using B . 3 Press C to select 'System'. 4 Select the line 'Installation' using B and confirm with C . P A message appears on the screen that the change of this setting will flush the 'Time Shift Buffer'. O If the 'Time Shift Buffer ' contains important recordings, save them with the REC/OTR n button first. Read additional information to the 'Time Shift Buffer' in the chapter 'The Time Shift Buffer'. 5 Select 'Yes' with D and confirm with OK . O If the message window was closed, confirm the line with C again. Installation Add/Delete Channels ... • Channel 001 Channel 002 Channel 003 Channel 004 Channel 005 Channel 006 ... Add Add Delete Delete Delete Delete To exit press SYSTEM MENU 7 Using B or A select the TV channel that you want to add or delete. 8 Use C and D to select 'Add' or 'Delete'. 9 Repeat steps 7 to 8 until you have added or deleted all the TV channels you want. 0 To store, press OK . A To end, press SYSTEM MENU . Setting the language For the basic setting of DVD playback, you can select the language for the subtitles and the audio language. Please note that with some DVDs the audio language and/or subtitle language can be changed only via the DVD menu. For recording, you can also switch the TV channel sound between stereo and an additional language (Secondary Audio Program SAP). Preparation: •) Switch on the TV set, and if necessary, select the channel for the DVD recorder (channel 3 or 4). •) Switch on the DVD recorder. 1 Press the BROWSER HDD button and then the SYSTEM MENU button on the remote control. P The menu bar appears. A 2 Select ' ' symbol with D or C . u 3 Select ' ' with B or A and confirm with the C button. Playback audio Subtitle Menu Language English English English 6 Select 'Add/Delete Channels' using B or A and confirm with C. 21
-
 1
1 -
2
-
3
-
4
-
5
-
6
-
7
-
8
-
9
-
10
-
11
-
12
-
13
-
14
-
15
-
16
-
17
-
18
-
19
-
20
-
21
-
22
-
 23
23 -
 24
24 -
 25
25 -
 26
26 -
 27
27 -
 28
28 -
 29
29 -
 30
30 -
 31
31 -
 32
32 -
 33
33 -
34
-
35
-
36
-
37
-
38
-
39
-
40
-
41
-
42
-
43
-
44
-
45
-
46
-
47
-
48
-
49
-
50
-
51
-
52
-
53
-
54
-
55
-
56
-
57
-
58
-
59
-
60
-
61
-
62
-
63
-
64
-
65
-
66
-
67
-
68
-
69
-
70
-
71
-
72
-
73
-
74
-
75
-
76
-
77
-
78
-
79
-
80
-
81
-
82
-
83
-
84
-
85
-
86
-
87
-
88
-
89
-
90
 |
 |
