Philips HDRW720 User manual - Page 40
Manual recordings, OTR recordings, Recording from a video recorder/DVD player
 |
View all Philips HDRW720 manuals
Add to My Manuals
Save this manual to your list of manuals |
Page 40 highlights
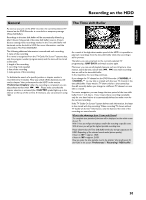
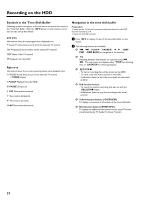
Recording on the HDD Manual recordings Recordings from the actual on the DVD-Recroder selected TV channel are always started and recorded in the time shift buffer as soon as you switch on the device. To store recordings on the HDD, choose from the following: Start of the recording: O Start the recording from the begin of the TV-show (Start is known from the TV Guide On Screen™System, or change of the TV program) Press REC/OTR n . O Start the recording from the actual position (from now) Hold REC/OTR n pressed, until the red light around the n button on the front is switched on. Stop the recording in progress: O Stop the recording automatically: If the start of the TV show is known from the TV Guide On Screen™System The recording will stop at the end of the TV-Show. O Stop the recording manually: Hold the red button on the remote control pressed, until the red light around the n button on the front is switched off. - You can mark a recording for storage on the HDD using REC/OTR n on the remote control or n on the device. Such marked recordings are displayed as a red bar in the time shift buffer and are not automatically deleted after the time shift buffer period (1 to 6 hours) expires. - If you switch off the DVD recorder with STANDBY m or select the 'Flush Buffer' function, all other recordings of the time shift buffer will be deleted. OTR recordings With this function you can record additional TV shows from the same program number: O Information from the TV Guide On Screen™system available The recording will be automatically stopped after the end of the TV show With each keypress, also the following TV shows will be recorded. (On the screen appears'1 program, 2 programs,...) O No Information from the TV Guide On Screen™system available The recording will be automatically stopped after 30 minutes. With each keypress, you prolong the switch-off time by 30 minutes If you press the red function button, the marker for the recording is removed. Recording from a video recorder/DVD player Please observe: Most pre-recorded video cassettes or DVDs are copy-protected. If you try to copy these, the message 'COPYPROTECT' will appear in the display of the DVD recorder. Preparation: •) Switch on the TV set, and if necessary, select the program number for the DVD recorder. •) Switch on the DVD recorder. •) Select recording mode (button TUNER , button SYSTEM MENU , 'Preferences', button C 'Record mode'). 1 Connect the video recorder/DVD Player as described in the chapter 'Connecting additional devices'. 2 Press TUNER to display the picture of the Video recorder/DVD player on the screen. 3 Use B , A to select the program number of the input jack to which the Video recorder/DVD player is connected. Please observe that for recordings via the front jacks S-VIDEO (CAM1) / VIDEO (CAM1) /'CAM1' or DV IN (CAM2) / 'CAM2' the recording mode must be selected under 'Camera mode' in 'Preferences' of the system menu. 4 Switch on the video recorder/DVD player. O In case playback has started automatically, interrupt it with STOP h or PAUSE 9 . 5 Start recording by pressing REC/OTR n on the DVD recorder and playback by pressing PLAY G on the video recorder/DVD player. a When copying video cassettes, 'NO SIGNAL' appears in the display of the DVD recorder b Check whether the cable connectors are properly inserted. b If the recording is made from a video recorder, change the 'tracking' setting on the video recorder. b In case of bad or non-standard video input signals, the DVD recorder may be unable to detect the signal. a When copying DVD video discs or pre-recorded video cassettes, the picture is fuzzy and brightness varies b This happens when you try to copy DVDs or video cassettes that are copy-protected. Although the complete cassette/disc is recorded, only parts without copy protected signal can be played back. This interference is unavoidable with copy-protected DVDs or video cassettes. 6 To stop the recording press and hold the red function button on the remote control until the red light around the n button is switched off. 33
-
 1
1 -
2
-
3
-
4
-
5
-
6
-
7
-
8
-
9
-
10
-
11
-
12
-
13
-
14
-
15
-
16
-
17
-
18
-
19
-
20
-
21
-
22
-
23
-
24
-
25
-
26
-
27
-
28
-
29
-
30
-
31
-
32
-
33
-
34
-
 35
35 -
 36
36 -
 37
37 -
 38
38 -
 39
39 -
 40
40 -
 41
41 -
 42
42 -
 43
43 -
 44
44 -
 45
45 -
46
-
47
-
48
-
49
-
50
-
51
-
52
-
53
-
54
-
55
-
56
-
57
-
58
-
59
-
60
-
61
-
62
-
63
-
64
-
65
-
66
-
67
-
68
-
69
-
70
-
71
-
72
-
73
-
74
-
75
-
76
-
77
-
78
-
79
-
80
-
81
-
82
-
83
-
84
-
85
-
86
-
87
-
88
-
89
-
90
 |
 |