Pioneer AVIC-90DVD Owner's Manual - Page 118
Press the A.MENU AUDIO button.
 |
View all Pioneer AVIC-90DVD manuals
Add to My Manuals
Save this manual to your list of manuals |
Page 118 highlights
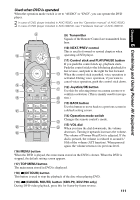
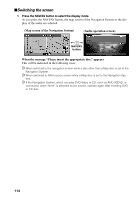
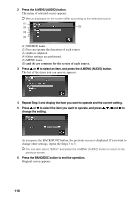
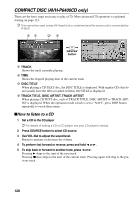
2 Press the A.MENU (AUDIO) button. The menu of selected source appears. ➲ Menus displayed on the screen differ according to the selected source. (1) (2) (5) (3) (4) (1) SOURCE name (2) You can operate the functions of each source. (3) Audio is adjusted. (4) Other settings are performed. (5) MENU name (3) and (4) are common for the screen of each source. 3 Press 5 or ∞ to select an item, and press the A.MENU (AUDIO) button. The list of the items you can operate appears. 4 Repeat Step 3 and display the item you want to operate and the current setting. 5 Press 5 or ∞ to select the item you want to operate, and press 5, ∞, 2 and 3 to change the setting. As you press the BACK/FUNC button, the previous screen is displayed. If you want to change other settings, repeat the Steps 3 to 5. ➲ You can also select "BACK" and press the A.MENU (AUDIO) button to return to the previous screen. 6 Press the BAND/ESC button to end the operation. Original screen appears. 116
-
 1
1 -
2
-
3
-
4
-
5
-
6
-
7
-
8
-
9
-
10
-
11
-
12
-
13
-
14
-
15
-
16
-
17
-
18
-
19
-
20
-
21
-
22
-
23
-
24
-
25
-
26
-
27
-
28
-
29
-
30
-
31
-
32
-
33
-
34
-
35
-
36
-
37
-
38
-
39
-
40
-
41
-
42
-
43
-
44
-
45
-
46
-
47
-
48
-
49
-
50
-
51
-
52
-
53
-
54
-
55
-
56
-
57
-
58
-
59
-
60
-
61
-
62
-
63
-
64
-
65
-
66
-
67
-
68
-
69
-
70
-
71
-
72
-
73
-
74
-
75
-
76
-
77
-
78
-
79
-
80
-
81
-
82
-
83
-
84
-
85
-
86
-
87
-
88
-
89
-
90
-
91
-
92
-
93
-
94
-
95
-
96
-
97
-
98
-
99
-
100
-
101
-
102
-
103
-
104
-
105
-
106
-
107
-
108
-
109
-
110
-
111
-
112
-
 113
113 -
 114
114 -
 115
115 -
 116
116 -
 117
117 -
 118
118 -
 119
119 -
 120
120 -
 121
121 -
 122
122 -
 123
123 -
124
-
125
-
126
-
127
-
128
-
129
-
130
-
131
-
132
-
133
-
134
-
135
-
136
-
137
-
138
-
139
-
140
-
141
-
142
-
143
-
144
-
145
-
146
-
147
-
148
-
149
-
150
-
151
-
152
-
153
-
154
-
155
-
156
-
157
-
158
-
159
-
160
-
161
-
162
-
163
-
164
-
165
-
166
-
167
-
168
-
169
-
170
-
171
-
172
-
173
-
174
-
175
-
176
-
177
-
178
-
179
-
180
-
181
-
182
-
183
-
184
-
185
-
186
-
187
-
188
-
189
-
190
-
191
-
192
-
193
-
194
-
195
-
196
-
197
-
198
-
199
-
200
 |
 |
