Pioneer AVIC-90DVD Owner's Manual - Page 26
Terminology, For AVIC-9DVD users, Dipswitch settings for AVIC-9DVD, About the difference in - avic 9dvd
 |
View all Pioneer AVIC-90DVD manuals
Add to My Manuals
Save this manual to your list of manuals |
Page 26 highlights
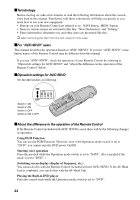
■Terminology Before moving on, take a few minutes to read the following information about the conventions used in this manual. Familiarity with these conventions will help you greatly as you learn how to use your new equipment. • Buttons on your Remote Control are referred to as: NAVI button, MENU button. • Items in various menus are referred to like this: "New Destination" and "Settings". • Extra information, alternative use and other notes are presented like this: ➲ After removing the disc from the slot, keep it in the case. ■For "AVIC-9DVD" users This manual describes the operation based on "AVIC-90DVD". If you use "AVIC-9DVD", some button names of the Remote Control may be different from this manual. If you use "AVIC-9DVD", check the operation of your Remote Control by referring to "Dipswitch settings for AVIC-9DVD" and "About the difference in the operation of the Remote Control" below. ■Dipswitch settings for AVIC-9DVD Set the dipswitches as following. ON ON 1 2 34 OFF Switch 1: ON Switch 2: ON Switch 3: OFF Switch 4: ON or OFF ■About the difference in the operation of the Remote Control If the Remote Control included with AVIC-9DVD is used, there will be the following changes in operation: Using PGM Function You can use the PGM Function. However, even if the Operation mode switch is set to "DVD", you cannot turn the DVD power On/Off. Starting voice operation Press the joystick while the Operation mode switch is set to "NAVI". (It is canceled if the mode is set to "DVD".) Switching screen display (display of frequency, etc.) You cannot do this with the Remote Control included with the AVIC-9DVD. If the AV Head Unit is combined, you can do this with the AV Head Unit. Playing the Built-in DVD player Press the control stick while the Operation mode switch is set to "DVD". 24
-
 1
1 -
2
-
3
-
4
-
5
-
6
-
7
-
8
-
9
-
10
-
11
-
12
-
13
-
14
-
15
-
16
-
17
-
18
-
19
-
20
-
 21
21 -
 22
22 -
 23
23 -
 24
24 -
 25
25 -
 26
26 -
 27
27 -
 28
28 -
 29
29 -
 30
30 -
 31
31 -
32
-
33
-
34
-
35
-
36
-
37
-
38
-
39
-
40
-
41
-
42
-
43
-
44
-
45
-
46
-
47
-
48
-
49
-
50
-
51
-
52
-
53
-
54
-
55
-
56
-
57
-
58
-
59
-
60
-
61
-
62
-
63
-
64
-
65
-
66
-
67
-
68
-
69
-
70
-
71
-
72
-
73
-
74
-
75
-
76
-
77
-
78
-
79
-
80
-
81
-
82
-
83
-
84
-
85
-
86
-
87
-
88
-
89
-
90
-
91
-
92
-
93
-
94
-
95
-
96
-
97
-
98
-
99
-
100
-
101
-
102
-
103
-
104
-
105
-
106
-
107
-
108
-
109
-
110
-
111
-
112
-
113
-
114
-
115
-
116
-
117
-
118
-
119
-
120
-
121
-
122
-
123
-
124
-
125
-
126
-
127
-
128
-
129
-
130
-
131
-
132
-
133
-
134
-
135
-
136
-
137
-
138
-
139
-
140
-
141
-
142
-
143
-
144
-
145
-
146
-
147
-
148
-
149
-
150
-
151
-
152
-
153
-
154
-
155
-
156
-
157
-
158
-
159
-
160
-
161
-
162
-
163
-
164
-
165
-
166
-
167
-
168
-
169
-
170
-
171
-
172
-
173
-
174
-
175
-
176
-
177
-
178
-
179
-
180
-
181
-
182
-
183
-
184
-
185
-
186
-
187
-
188
-
189
-
190
-
191
-
192
-
193
-
194
-
195
-
196
-
197
-
198
-
199
-
200
 |
 |
