Ricoh P 311 Users Guide - Page 159
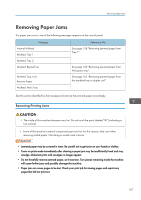
Removing Paper Jams, Removing Printing Jams
 |
View all Ricoh P 311 manuals
Add to My Manuals
Save this manual to your list of manuals |
Page 159 highlights
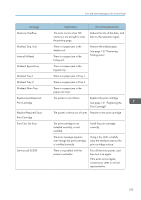
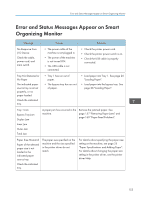
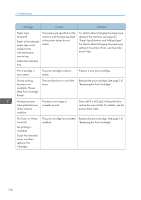
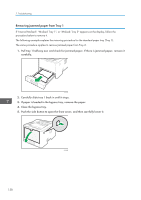
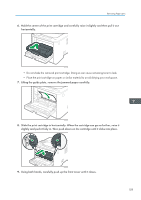
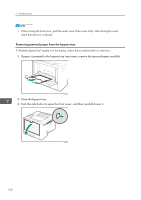
Removing Paper Jams Removing Paper Jams If a paper jam occurs, one of the following messages appears on the control panel: Message Internal Misfeed Misfeed: Tray 1 Misfeed: Tray 2 Misfeed: BypassTray Misfeed: Dup. Unit Remove Paper Misfeed: Main Tray Reference title See page 158 "Removing jammed paper from Tray 1". See page 160 "Removing jammed paper from the bypass tray". See page 162 "Removing jammed paper from the standard tray or duplex unit". See the section identified by the message and remove the jammed paper accordingly. Removing Printing Jams • The inside of this machine becomes very hot. Do not touch the parts labeled " " (indicating a hot surface). • Some of this machine's internal components get very hot. For this reason, take care when removing misfed paper. Not doing so could result in burns. • Jammed paper may be covered in toner. Be careful not to get toner on your hands or clothes. • Toner on prints made immediately after clearing a paper jam may be insufficiently fused and may smudge. Make test prints until smudges no longer appear. • Do not forcefully remove jammed paper, as it may tear. Torn pieces remaining inside the machine will cause further jams and possibly damage the machine. • Paper jam can cause pages to be lost. Check your print job for missing pages and reprint any pages that did not print out. 157
-
 1
1 -
2
-
3
-
4
-
5
-
6
-
7
-
8
-
9
-
10
-
11
-
12
-
13
-
14
-
15
-
16
-
17
-
18
-
19
-
20
-
21
-
22
-
23
-
24
-
25
-
26
-
27
-
28
-
29
-
30
-
31
-
32
-
33
-
34
-
35
-
36
-
37
-
38
-
39
-
40
-
41
-
42
-
43
-
44
-
45
-
46
-
47
-
48
-
49
-
50
-
51
-
52
-
53
-
54
-
55
-
56
-
57
-
58
-
59
-
60
-
61
-
62
-
63
-
64
-
65
-
66
-
67
-
68
-
69
-
70
-
71
-
72
-
73
-
74
-
75
-
76
-
77
-
78
-
79
-
80
-
81
-
82
-
83
-
84
-
85
-
86
-
87
-
88
-
89
-
90
-
91
-
92
-
93
-
94
-
95
-
96
-
97
-
98
-
99
-
100
-
101
-
102
-
103
-
104
-
105
-
106
-
107
-
108
-
109
-
110
-
111
-
112
-
113
-
114
-
115
-
116
-
117
-
118
-
119
-
120
-
121
-
122
-
123
-
124
-
125
-
126
-
127
-
128
-
129
-
130
-
131
-
132
-
133
-
134
-
135
-
136
-
137
-
138
-
139
-
140
-
141
-
142
-
143
-
144
-
145
-
146
-
147
-
148
-
149
-
150
-
151
-
152
-
153
-
 154
154 -
 155
155 -
 156
156 -
 157
157 -
 158
158 -
 159
159 -
 160
160 -
 161
161 -
 162
162 -
 163
163 -
 164
164 -
165
-
166
-
167
-
168
-
169
-
170
-
171
-
172
-
173
-
174
-
175
-
176
-
177
-
178
-
179
-
180
-
181
-
182
-
183
-
184
-
185
-
186
-
187
-
188
-
189
-
190
-
191
-
192
-
193
-
194
-
195
-
196
-
197
-
198
-
199
-
200
-
201
-
202
-
203
-
204
-
205
-
206
-
207
-
208
-
209
-
210
-
211
-
212
-
213
-
214
-
215
-
216
-
217
-
218
-
219
-
220
 |
 |
