Ricoh P 311 Users Guide - Page 161
Slide the print cartridge in horizontally. When the cartridge can go no further, raise
 |
View all Ricoh P 311 manuals
Add to My Manuals
Save this manual to your list of manuals |
Page 161 highlights
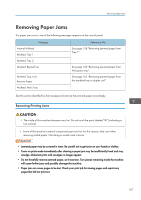
Removing Paper Jams 6. Hold the center of the print cartridge and carefully raise it slightly and then pull it out horizontally. DYG270 • Do not shake the removed print cartridge. Doing so can cause remaining toner to leak. • Place the print cartridge on paper or similar material to avoid dirtying your workspace. 7. Lifting the guide plate, remove the jammed paper carefully. DYG291 8. Slide the print cartridge in horizontally. When the cartridge can go no further, raise it slightly and push it fully in. Then push down on the cartridge until it clicks into place. DYG275 9. Using both hands, carefully push up the front cover until it closes. 159
-
 1
1 -
2
-
3
-
4
-
5
-
6
-
7
-
8
-
9
-
10
-
11
-
12
-
13
-
14
-
15
-
16
-
17
-
18
-
19
-
20
-
21
-
22
-
23
-
24
-
25
-
26
-
27
-
28
-
29
-
30
-
31
-
32
-
33
-
34
-
35
-
36
-
37
-
38
-
39
-
40
-
41
-
42
-
43
-
44
-
45
-
46
-
47
-
48
-
49
-
50
-
51
-
52
-
53
-
54
-
55
-
56
-
57
-
58
-
59
-
60
-
61
-
62
-
63
-
64
-
65
-
66
-
67
-
68
-
69
-
70
-
71
-
72
-
73
-
74
-
75
-
76
-
77
-
78
-
79
-
80
-
81
-
82
-
83
-
84
-
85
-
86
-
87
-
88
-
89
-
90
-
91
-
92
-
93
-
94
-
95
-
96
-
97
-
98
-
99
-
100
-
101
-
102
-
103
-
104
-
105
-
106
-
107
-
108
-
109
-
110
-
111
-
112
-
113
-
114
-
115
-
116
-
117
-
118
-
119
-
120
-
121
-
122
-
123
-
124
-
125
-
126
-
127
-
128
-
129
-
130
-
131
-
132
-
133
-
134
-
135
-
136
-
137
-
138
-
139
-
140
-
141
-
142
-
143
-
144
-
145
-
146
-
147
-
148
-
149
-
150
-
151
-
152
-
153
-
154
-
155
-
 156
156 -
 157
157 -
 158
158 -
 159
159 -
 160
160 -
 161
161 -
 162
162 -
 163
163 -
 164
164 -
 165
165 -
 166
166 -
167
-
168
-
169
-
170
-
171
-
172
-
173
-
174
-
175
-
176
-
177
-
178
-
179
-
180
-
181
-
182
-
183
-
184
-
185
-
186
-
187
-
188
-
189
-
190
-
191
-
192
-
193
-
194
-
195
-
196
-
197
-
198
-
199
-
200
-
201
-
202
-
203
-
204
-
205
-
206
-
207
-
208
-
209
-
210
-
211
-
212
-
213
-
214
-
215
-
216
-
217
-
218
-
219
-
220
 |
 |

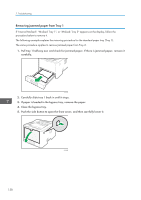
6.
Hold the center of the print cartridge and carefully raise it slightly and then pull it out
horizontally.
DYG270
•
Do not shake the removed print cartridge. Doing so can cause remaining toner to leak.
•
Place the print cartridge on paper or similar material to avoid dirtying your workspace.
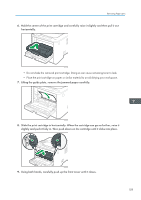
7.
Lifting the guide plate, remove the jammed paper carefully.
DYG291
8.
Slide the print cartridge in horizontally. When the cartridge can go no further, raise it
slightly and push it fully in. Then push down on the cartridge until it clicks into place.
DYG275
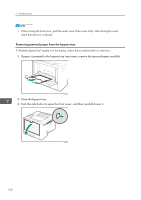
9.
Using both hands, carefully push up the front cover until it closes.
Removing Paper Jams
159