Samsung HT-FM65WC User Manual - Page 17
Connecting to TV/External Devices, Connecting to a TV
 |
View all Samsung HT-FM65WC manuals
Add to My Manuals
Save this manual to your list of manuals |
Page 17 highlights
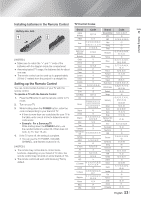
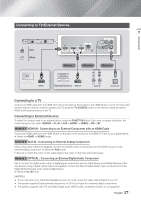
03 Connections Connecting to TV/External Devices POWER SPEAKERS OUT FRONT R FRONT L SUBWOOFER CENTER IMPEDANCE : 3Ÿ LAN HDMI OUT 1 HDMI IN 2 AUX IN FM ANT L R OPTICAL DIGITAL AUDIO IN Red R White W LAN HDMI OUT 1 HDMI IN 2 AUX IN FM ANT L R OPTICAL DIGITAL AUDIO IN Method 1 Method 2 Method 3 HDMI IN External Devices HDMI OUT AUDIO OUT OPTICAL OUT Connecting to a TV Connect an HDMI cable from the HDMI OUT jack on the back of the product to the HDMI IN jack on your TV. If you have set the product's remote control to operate your TV, press the TV SOURCE button on the remote control and select HDMI as the external source of the TV. Connecting to External Devices To select the correct mode for an external device, press the FUNCTION button. Each time you press the button, the mode changes in this order : BD/DVD D. IN AUX HDMI1 HDMI2 FM BT Method 1 HDMI IN : Connecting to an External Component with an HDMI Cable Connect an HDMI cable from the HDMI IN jack on the back of the product to the HDMI OUT jack on your digital device. Select the HDMI1 or HDMI2 mode. Method 2 AUX IN : Connecting an External Analog Component Using a RCA audio cable (not supplied), connect the AUDIO In jack on the product to the AUDIO Out jack on the external analog component. Select the AUX mode. • Be sure to match the colors on the cable plugs to the colors on the input and output jacks. Method 3 OPTICAL : Connecting an External Digital Audio Component Use to connect the digital audio output of digital signal components such as Cable Boxes and Satellite Receivers (SetTop-Boxes). Using a digital optical cable (not supplied), connect the Optical Digital Audio In jack on the product to the Digital Optical Out jack of the external digital device. Select the D. IN mode. | NOTES | \ To see video from your Cable Box/Satellite receiver, you must connect its video output directly to your TV. \ This system supports Digital sampling frequencies of 32 kHz or higher from external digital components. \ This system supports only DTS and Dolby Digital audio. MPEG audio, a bitstream format, is not supported English 17 |
-
 1
1 -
2
-
3
-
4
-
5
-
6
-
7
-
8
-
9
-
10
-
11
-
 12
12 -
 13
13 -
 14
14 -
 15
15 -
 16
16 -
 17
17 -
 18
18 -
 19
19 -
 20
20 -
 21
21 -
 22
22 -
23
-
24
-
25
-
26
-
27
-
28
-
29
-
30
-
31
-
32
-
33
-
34
-
35
-
36
-
37
-
38
-
39
-
40
-
41
-
42
-
43
-
44
-
45
-
46
-
47
-
48
-
49
-
50
-
51
-
52
-
53
-
54
-
55
-
56
-
57
-
58
 |
 |
