Samsung NV10 User Manual (user Manual) (ver.1.0) (English) - Page 10
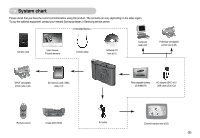
Advanced Shake Reduction ASR mode. This mode will - usb cable
 |
UPC - 044701006749
View all Samsung NV10 manuals
Add to My Manuals
Save this manual to your list of manuals |
Page 10 highlights
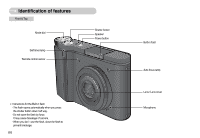
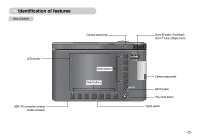
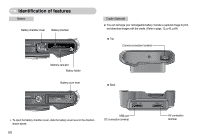
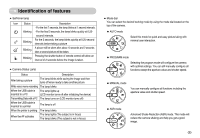
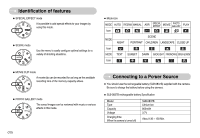
Identification of features ƈ Self-timer lamp Icon Status Description - For the first 7 seconds, the lamp blinks at 1 second intervals. Blinking - For the final 3 seconds, the lamp blinks quickly at 0.25- second intervals. For the 2 seconds, the lamp blinks quickly at 0.25-second Blinking intervals before taking a picture A picture will be taken after about 10 seconds and 2 seconds Blinking later a second picture will be taken. Pressing the shutter button of remote control will allow an Blinking interval of 2 seconds before the image is taken. ƈ Camera Status Lamp Status Description After taking a picture The lamp blinks while saving the image and then turns off when ready to take another picture While voice memo recording The lamp blinks When the USB cable is The lamp lights up inserted to a PC (LCD monitor turns off after initializing the device) Transmitting Data with a PC The lamp turns on (LCD monitor turns off) When the USB cable is inserted to a printer The lamp is off When the printer is printing The lamp blinks When the AF activates The lamp lights (The subject is in focus) The lamp blinks (The subject is not in focus) ƈ Mode dial You can select the desired working mode by using the mode dial located on the top of the camera. ƃ AUTO mode Select this mode for quick and easy picture taking with minimal user interaction. ƃ PROGRAM mode Selecting the program mode will configure the camera with optimal settings. You can still manually configure all functions except the aperture value and shutter speed. ƃ MANUAL mode You can manually configure all functions including the aperture value and shutter speed. ƃ ASR mode Advanced Shake Reduction (ASR) mode. This mode will reduce the camera shaking and help you get a good image. ŝ9Ş
-
 1
1 -
2
-
3
-
4
-
 5
5 -
 6
6 -
 7
7 -
 8
8 -
 9
9 -
 10
10 -
 11
11 -
 12
12 -
 13
13 -
 14
14 -
 15
15 -
16
-
17
-
18
-
19
-
20
-
21
-
22
-
23
-
24
-
25
-
26
-
27
-
28
-
29
-
30
-
31
-
32
-
33
-
34
-
35
-
36
-
37
-
38
-
39
-
40
-
41
-
42
-
43
-
44
-
45
-
46
-
47
-
48
-
49
-
50
-
51
-
52
-
53
-
54
-
55
-
56
-
57
-
58
-
59
-
60
-
61
-
62
-
63
-
64
-
65
-
66
-
67
-
68
-
69
-
70
-
71
-
72
-
73
-
74
 |
 |
