Samsung NV10 User Manual (user Manual) (ver.1.0) (English) - Page 32
White balance
 |
UPC - 044701006749
View all Samsung NV10 manuals
Add to My Manuals
Save this manual to your list of manuals |
Page 32 highlights
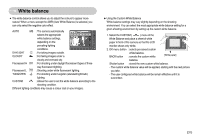
White balance ƈ The white balance control allows you to adjust the colours to appear more natural. When a menu except the AWB (Auto White Balance) is selected, you can only select the negative color effect. AUTO : The camera automatically selects the appropriate white balance settings, depending on the prevailing lighting conditions. DAYLIGHT : For taking images outside. CLOUDY : For taking images under a cloudy and overcast sky. Fluorescent H : For shooting under daylight fluorescent types of three way fluorescent lighting. Fluorescent L : Shooting under white fluorescent lighting. TUNGSTEN : For shooting under tungsten (standard light bulb) lighting. CUSTOM : Allows the user to set the white balance according to the shooting condition. Different lighting conditions may cause a colour cast on your images. ƃ Using the Custom White Balance White balance settings may vary slightly depending on the shooting environment. You can select the most appropriate white balance setting for a given shooting environment by setting up the custom white balance. 1. Select the CUSTOM ( ) menu of the White Balance and place a sheet of white paper in front of the camera so that the LCD monitor shows only white. 2. OK menu button : selects pre-saved custom white balance. BACK button : cancels the custom white ٌ [White paper] balance. Shutter button : stored the new custom white balance. - The custom white balance value will be applied, starting with the next picture you take. - The user configured white balance will be remain effective until it is overwritten. ŝ31Ş
-
 1
1 -
2
-
3
-
4
-
5
-
6
-
7
-
8
-
9
-
10
-
11
-
12
-
13
-
14
-
15
-
16
-
17
-
18
-
19
-
20
-
21
-
22
-
23
-
24
-
25
-
26
-
 27
27 -
 28
28 -
 29
29 -
 30
30 -
 31
31 -
 32
32 -
 33
33 -
 34
34 -
 35
35 -
 36
36 -
 37
37 -
38
-
39
-
40
-
41
-
42
-
43
-
44
-
45
-
46
-
47
-
48
-
49
-
50
-
51
-
52
-
53
-
54
-
55
-
56
-
57
-
58
-
59
-
60
-
61
-
62
-
63
-
64
-
65
-
66
-
67
-
68
-
69
-
70
-
71
-
72
-
73
-
74
 |
 |
