Samsung NV10 User Manual (user Manual) (ver.1.0) (English) - Page 66
Removing the removable disk, Starting PC mode
 |
UPC - 044701006749
View all Samsung NV10 manuals
Add to My Manuals
Save this manual to your list of manuals |
Page 66 highlights
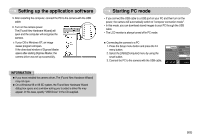
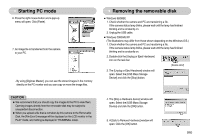
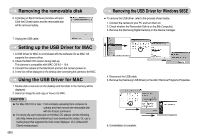
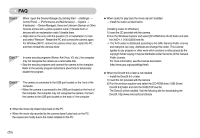
Starting PC mode 6. Press the right mouse button and a pop-up menu will open. Click [Paste]. 7. An image file is transferred from the camera to your PC. - By using [Digimax Master], you can see the stored images in the memory directly on the PC monitor and you can copy or move the image files. CAUTION ƃ We recommend that you should copy the images to the PC to view them. Opening images directly from the removable disk may be subject to unexpected disconnection. ƃ When you upload a file that is not taken by this camera to the Removable Disk, the [File Error!] message will be displayed on the LCD monitor in the PLAY mode, and nothing is displayed in THUMBNAIL mode. Removing the removable disk ƈ Windows 98/98SE 1. Check whether the camera and PC are transferring a file. If the camera status lamp blinks, please wait until the lamp has finished blinking and is constantly on. 2. Unplug the USB cable. ƈ Windows 2000/ME/XP (The illustrations may differ from those shown depending on the Windows O/S.) 1. Check whether the camera and PC are transferring a file. If the camera status lamp blinks, please wait until the lamp has finished blinking and is constantly on. 2. Double-click the [Unplug or Eject Hardware] icon on the task bar. [Double-click!] 3. The [Unplug or Eject Hardware] window will open. Select the [USB Mass Storage Device] and click the [Stop] button. 4. The [Stop a Hardware device] window will open. Select the [USB Mass Storage Device] and click the [OK] button. 5. A [Safe to Remove Hardware] window will open. Click the [OK] button. ŝ65Ş
-
 1
1 -
2
-
3
-
4
-
5
-
6
-
7
-
8
-
9
-
10
-
11
-
12
-
13
-
14
-
15
-
16
-
17
-
18
-
19
-
20
-
21
-
22
-
23
-
24
-
25
-
26
-
27
-
28
-
29
-
30
-
31
-
32
-
33
-
34
-
35
-
36
-
37
-
38
-
39
-
40
-
41
-
42
-
43
-
44
-
45
-
46
-
47
-
48
-
49
-
50
-
51
-
52
-
53
-
54
-
55
-
56
-
57
-
58
-
59
-
60
-
 61
61 -
 62
62 -
 63
63 -
 64
64 -
 65
65 -
 66
66 -
 67
67 -
 68
68 -
 69
69 -
 70
70 -
 71
71 -
72
-
73
-
74
 |
 |
