Samsung SC-X105L User Manual (ENGLISH) - Page 65
Photo
 |
UPC - 036725301054
View all Samsung SC-X105L manuals
Add to My Manuals
Save this manual to your list of manuals |
Page 65 highlights
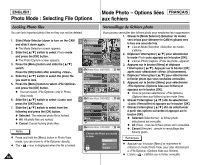
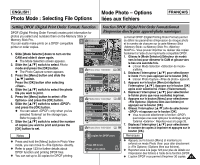
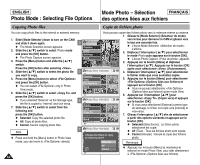
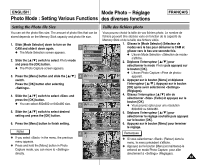
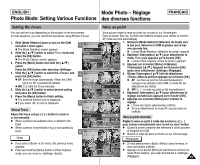
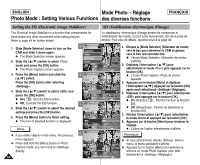
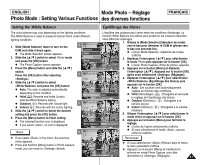
ENGLISH Mode Photo - Réglage Photo Mode: Setting Various Functions des diverses fonctions FRANÇAIS Setting the Focus Mise au point You can set the focus depending on the subject or the environment. Vous pouvez régler la mise au point sur le sujet ou sur l'arrière-plan. In most situations, you can record the best photo using AF(Auto Focus). Dans la plupart des cas, la photo est meilleure lorsque vous utilisez la fonction AF (mise au point automatique). 1. Slide [Mode Selector] down to turn on the CAM and slide it down again. N The Mode Selection screen appears. 2. Slide the [ L /M ] switch to select Photo mode and press the [OK] button. N The Photo Capture screen appears. 3. Press the [Menu] button and slide the [ L /M ] switch. Press the [OK] button after selecting . 4. Slide the [ L /M ] switch to select the and press the [OK] button. N AF: Sets the focus automatically. When the CAM 3 Photo Capture 800 Capture View Settings Back 4 Photo Settings Size 1. Glissez le [Mode Selector] (Sélecteur de mode) vers le bas pour démarrer le CAM et glissez vers le bas une seconde fois. N L'écran Mode Selection apparaît. 2. Déplacez l'interrupteur [ L /M ] pour sélectionner le mode Photo puis appuyez sur le bouton [OK]. N L'écran Photo Capture apparaît. 3. Appuyez sur le bouton [Menu] et déplacez l'interrupteur [ L /M ]. Appuyez sur le bouton [OK] après avoir sélectionné (Réglages). 4. Glissez l'interrupteur [ L /M ] afin de sélectionner (Mise au point) et appuyez sur le bouton [OK]. N AF : La mise au point se fait automatiquement. turns on, AF is selected by default. Light Auto Lorsque vous allumez votre CAM, le mode AF est N MF( ): Sets the focus manually. Focus AF sélectionné par défaut. 5. Slide the [ L /M ] switch to select desired setting and press the [OK] button. 6. Press the [Menu] button to finish setting. N The selected function icon is displayed. N If you select AF, no icon is displayed. Manual Focus EIS On White Balance Auto 5 Photo Settings Size Light Auto N MF( ) : La mise au point se fait manuellement. 5. Déplacez l'interrupteur [ L /M ] pour sélectionner le réglage souhaité puis appuyez sur le bouton [OK]. 6. Appuyez sur le bouton [Menu] pour terminer le réglage. N L'icône de l'option sélectionnée s'affiche. N Si vous sélectionnez le mode AF, aucune icône ne s'affiche. Adjust the focus using button to zoom in or out manually. N When a picture has subjects close or distant to the CAM Focus MF EIS On White Balance Auto Mise au point manuelle Réglez la mise au point à l'aide des boutons pour zoomer manuellement vers l'avant ou vers l'arrière. N When a person is enveloped in fog or surrounded by N Quand la scène comporte des éléments à la fois proches snow 6 Photo Capture 800 et éloignés du CAM. N Quand un sujet est dans la brume ou sur fond enneigé. Notes Remarques ✤ If you select in the menu, the previous menu appears. ✤ Press and hold the [Menu] button in Photo Capture mode, you can move to directly. Capturing... BLC ✤ Si vous sélectionnez (Retour) dans le menu, le menu précédent s'affiche. ✤ Appuyez sur le bouton [Menu] et maintenez-le enfoncé en mode Photo Capture pour aller directement à (Réglages). 65
-
 1
1 -
2
-
3
-
4
-
5
-
6
-
7
-
8
-
9
-
10
-
11
-
12
-
13
-
14
-
15
-
16
-
17
-
18
-
19
-
20
-
21
-
22
-
23
-
24
-
25
-
26
-
27
-
28
-
29
-
30
-
31
-
32
-
33
-
34
-
35
-
36
-
37
-
38
-
39
-
40
-
41
-
42
-
43
-
44
-
45
-
46
-
47
-
48
-
49
-
50
-
51
-
52
-
53
-
54
-
55
-
56
-
57
-
58
-
59
-
 60
60 -
 61
61 -
 62
62 -
 63
63 -
 64
64 -
 65
65 -
 66
66 -
 67
67 -
 68
68 -
 69
69 -
 70
70 -
71
-
72
-
73
-
74
-
75
-
76
-
77
-
78
-
79
-
80
-
81
-
82
-
83
-
84
-
85
-
86
-
87
-
88
-
89
-
90
-
91
-
92
-
93
-
94
-
95
-
96
-
97
-
98
-
99
-
100
-
101
-
102
-
103
-
104
-
105
-
106
-
107
-
108
-
109
-
110
-
111
-
112
-
113
-
114
-
115
-
116
-
117
-
118
-
119
-
120
-
121
-
122
-
123
-
124
-
125
-
126
-
127
-
128
-
129
-
130
-
131
-
132
-
133
-
134
-
135
-
136
-
137
 |
 |
