Sharp MX-6500N Adjustment Guide - Page 21
Off-Centre Adjustment
 |
View all Sharp MX-6500N manuals
Add to My Manuals
Save this manual to your list of manuals |
Page 21 highlights
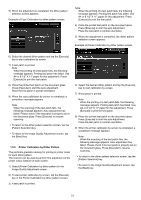
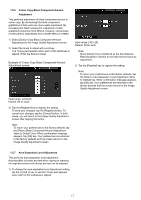
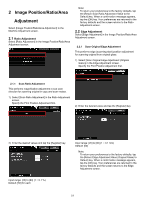
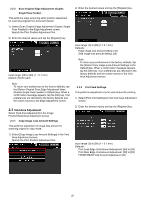
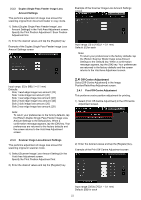
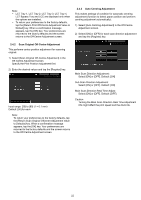
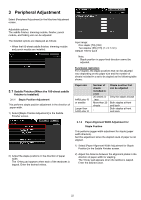
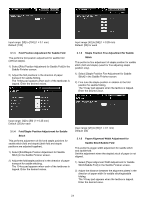
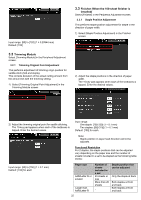
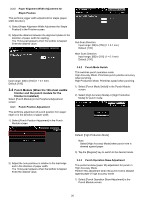
2.3.3 Duplex Single Pass Feeder Image Loss Amount Settings This performs adjustment of image loss amount for scanning original from document feeder in copy mode. 1) Select [Duplex Single Pass Feeder Image Loss Amount Settings] in the Void Area Adjustment screen. Specify the Print Position Adjustment / Scan Position Adjustment first. 2) Enter the desired values and tap the [Register] key. Example of the Duplex Single Pass Feeder Image Loss Amount Settings screen Example of the Scanner Image Loss Amount Settings screen Input range: [0] to [100] (1 = 0.1 mm) Default: [0] for each Note: To return your preferences to the factory defaults, tap the [Return Scanner Mode Image Loss Amount Settings to the Default] key. When a confirmation message appears, tap the [OK] key. Your preferences are returned to the factory defaults and the screen returns to the Void Area Adjustment screen. Input range: [0] to [99] (1 = 0.1 mm) Defaults: Side 1 lead edge image loss amount: [20] Side 1 side image loss amount: [20] Side 1 rear edge image loss amount: [40] Side 2 lead edge image loss amount: [40] Side 2 side image loss amount: [20] Side 2 rear edge image loss amount: [20] Note: To return your preferences to the factory defaults, tap the [Return Duplex Single Pass Feeder Image Loss Amount Settings to the Default] key. When a confirmation message appears, tap the [OK] key. Your preferences are returned to the factory defaults and the screen returns to the Void Area Adjustment screen. 2.4 Off-Centre Adjustment Select [Off-Centre Adjustment] in the Image Position/Ratio/Area Adjustment screen. 2.4.1 Print Off-Centre Adjustment This performs centre position adjustment for printing. 1) Select [Print Off-Centre Adjustment] in the Off-Centre Adjustment screen. 2.3.4 Scanner Image Loss Amount Settings This performs adjustment of image loss amount for scanning original in scanner mode. 1) Select [Scanner Image Loss Amount Settings] in the Void Area Adjustment screen. Specify the Print Position Adjustment first. 2) Enter the desired values and tap the [Register] key. 2) Enter the desired values and tap the [Register] key. Example of the Print Off-Centre Adjustment screen Input range: [30] to [70] (1 = 0.1 mm) Default: [50] for each 21
-
 1
1 -
2
-
3
-
4
-
5
-
6
-
7
-
8
-
9
-
10
-
11
-
12
-
13
-
14
-
15
-
 16
16 -
 17
17 -
 18
18 -
 19
19 -
 20
20 -
 21
21 -
 22
22 -
 23
23 -
 24
24 -
 25
25 -
 26
26 -
27
-
28
-
29
-
30
 |
 |
