Sharp MX-6500N Adjustment Guide - Page 22
Scan Original Off-Centre Adjustment, Auto Centring Adjustment
 |
View all Sharp MX-6500N manuals
Add to My Manuals
Save this manual to your list of manuals |
Page 22 highlights
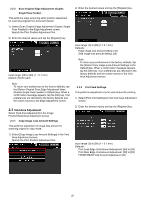
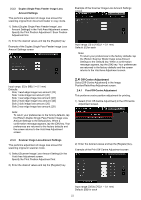
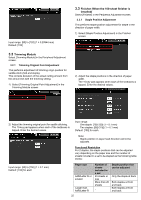
Note: LCT Tray 1, LCT Tray 2, LCT Tray 3, LCT Tray 4, LCT Bypass Tray and LCC are displayed only when the options are installed. To return your preferences to the factory defaults, tap the [Return Print Off-Centre Adjustment Value to Default] key. When a confirmation message appears, tap the [OK] key. Your preferences are returned to the factory defaults and the screen returns to the Off-Centre Adjustment screen. 2.4.3 Auto Centring Adjustment This makes settings of condition for automatic centring adjustment (function to detect paper position and perform centring adjustment automatically). 1) Select [Auto Centring Adjustment] in the Off-Centre Adjustment screen. 2) Select [ON] or [OFF] for each scan direction adjustment and tap the [Register] key. 2.4.2 Scan Original Off-Centre Adjustment This performs centre position adjustment for scanning original. 1) Select [Scan Original Off-Centre Adjustment] in the Off-Centre Adjustment screen. Specify the Print Position Adjustment first. 2) Enter the desired values and tap the [Register] key. Input range: [20] to [80] (1 = 0.1 mm) Default: [50] for each Note: To return your preferences to the factory defaults, tap the [Return Scan Original Offcentre Adjustment Value to Defaults] key. When a confirmation message appears, tap the [OK] key. Your preferences are returned to the factory defaults and the screen returns to the Off-Centre Adjustment screen. Main Scan Direction Adjustment: Select [ON] or [OFF]. Default: [ON] Sub Scan Direction Adjustment: Select [ON] or [OFF]. Default: [ON] Main Scan Direction Real Time Adjust: Select [ON] or [OFF]. Default: [OFF] Caution: Turning the Main Scan Direction Real Time Adjustment ON might affect the print speed and the drum life. 22
-
 1
1 -
2
-
3
-
4
-
5
-
6
-
7
-
8
-
9
-
10
-
11
-
12
-
13
-
14
-
15
-
16
-
 17
17 -
 18
18 -
 19
19 -
 20
20 -
 21
21 -
 22
22 -
 23
23 -
 24
24 -
 25
25 -
 26
26 -
 27
27 -
28
-
29
-
30
 |
 |
