Sharp MX-6500N Adjustment Guide - Page 8
Correction Amount Display, Densitometer/Visual Adjustment
 |
View all Sharp MX-6500N manuals
Add to My Manuals
Save this manual to your list of manuals |
Page 8 highlights
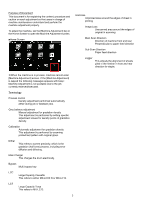
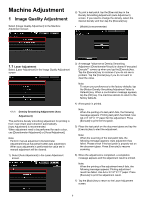
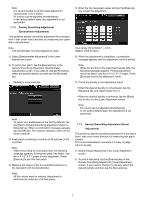
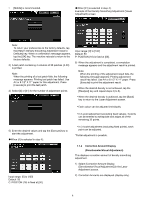
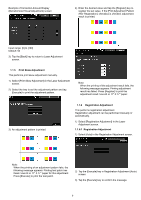
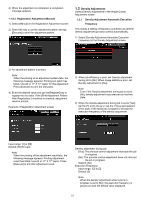
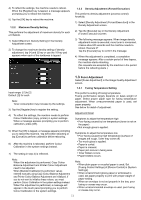
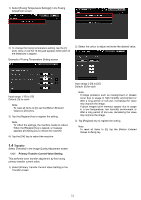
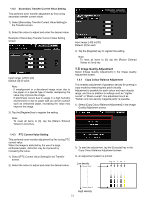
[Middle] is recommended. ◆When [31] is selected in step 4): Example of the Density Smoothing Adjustment (Visual Adjustment) screen Note: To return your preferences to the factory defaults, tap the [Return Density Smoothing Adjustment Value to Defaults] key. When a confirmation message appears, tap the [OK] key. The machine reboots to return to the factory defaults. 3) A test patch containing 4 columns of 28 patches (3-30) is printed. Note: When the printing of a test patch fails, the following message appears: Printing test patch has failed. Use A4 or 8 1/2" X 11" paper for this adjustment. Press [Execute] to print the test patch. 4) Select [4] or [31] for the number of adjustment points. Input range: [0] to [100] Default: 50 P: POSITON (16) is fixed at [50]. 6) When the adjustment is completed, a completion message appears and the adjustment result is printed. Note: When the printing of the adjustment result fails, the following message appears: Printing adjustment result has failed. Use A4 or 8 1/2" X 11" paper. Press [Execute] to print the adjustment result. When the desired density is not achieved, tap the [Readjust] key and repeat steps 3) to 6). When the desired density is achieved, tap the [Back] key to return to the Laser Adjustment screen. Each colour can be adjusted individually. In 4-point adjustment (excluding fixed values), 4 points can be entered to extrapolate and adjust all of the remaining 32 points. 5) Enter the desired values and tap the [Execute] key to start the adjustment. ◆When [4] is selected in step 4): In 31-point adjustment (excluding fixed points), each point can be adjusted. *Partial adjustment is possible. Input range: [0] to [100] Default: 50 C: POSITON (16) is fixed at [50]. 1.1.4 Correction Amount Display (Densitometer/Visual Adjustment) This displays correction amount of density smoothing adjustment. 1) Select [Correction Amount Display (Densitometer/Visual Adjustment)] in the Laser Adjustment screen. 2) Correction Amounts are displayed (display only). 8
-
 1
1 -
2
-
 3
3 -
 4
4 -
 5
5 -
 6
6 -
 7
7 -
 8
8 -
 9
9 -
 10
10 -
 11
11 -
 12
12 -
 13
13 -
14
-
15
-
16
-
17
-
18
-
19
-
20
-
21
-
22
-
23
-
24
-
25
-
26
-
27
-
28
-
29
-
30
 |
 |
