Sony DVWM2000 Product Manual (dvwm2000 installation manual) - Page 12
Attaching the outer rails, Loosely attaching the rail brackets
 |
View all Sony DVWM2000 manuals
Add to My Manuals
Save this manual to your list of manuals |
Page 12 highlights
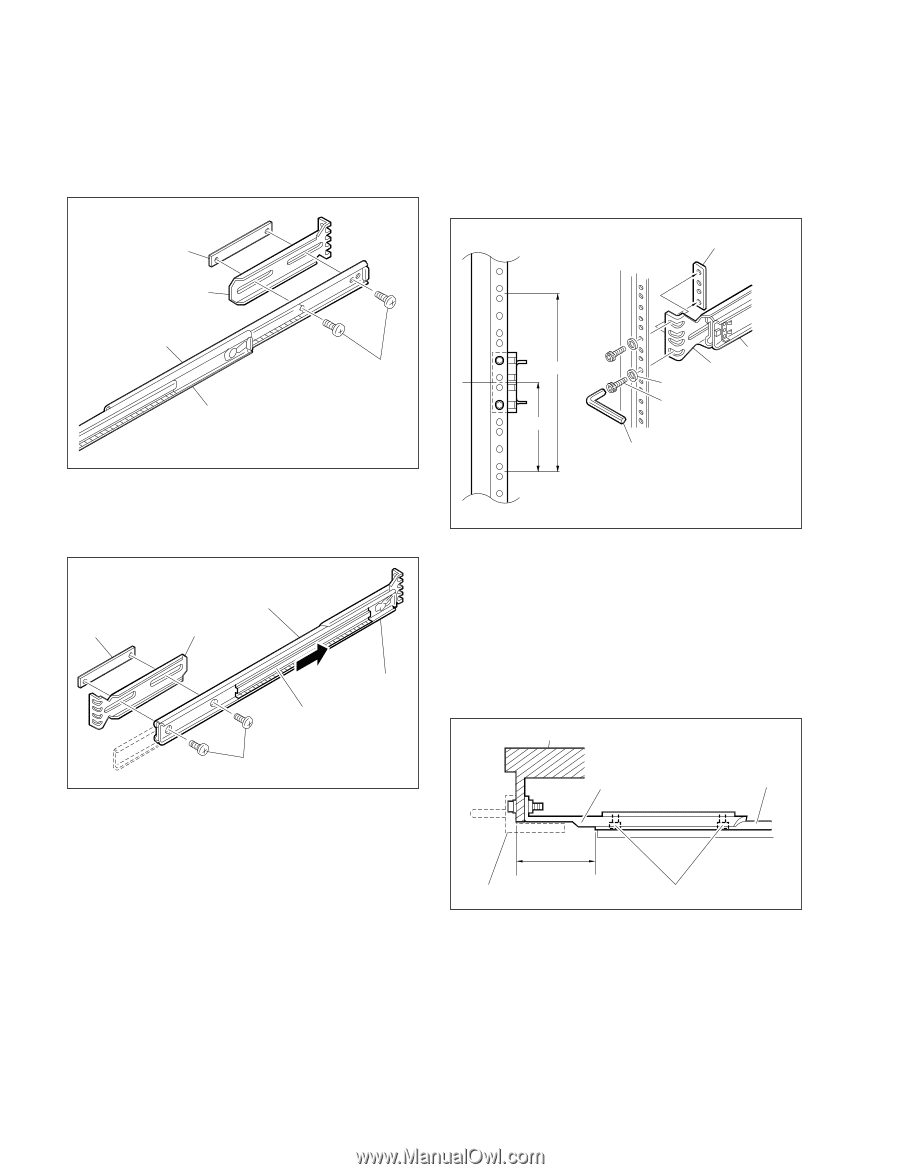
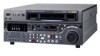
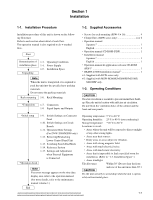
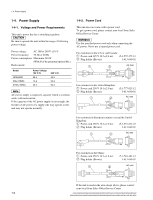
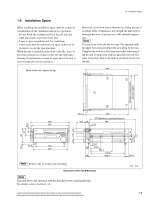
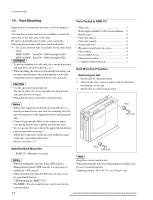
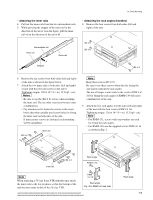
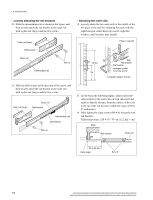
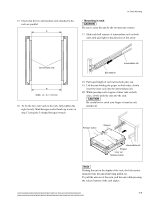
1-6. Rack Mounting . Loosely attaching the rail brackets 10. Slide the intermediate rail as shown in the figure, and then loosely attach the rail bracket to the outer rail with a plate nut (large) and the two screws. Plate nut (large) Rail bracket . Attaching the outer rails 12. Loosely attach the two outer rails to the middle of the 4U space in the rack for mounting this unit, with the eight hexagon socket head cap screws, eight flat washers, and four plate nuts (small). Plate nut (small) Outer rail Intermediate rail B4 x 8 By 4U 2U Rail Rail bracket Flat washer Hexagon socket head cap screw L-shaped hexagon wrench 11. Slide the ball retainer in the direction of the arrow, and then loosely attach the rail bracket to the outer rail with a plate nut (large) and the two screws. Plate nut (large) Outer rail Rail bracket Intermediate rail Ball retainer B4 x 8 13. As shown in the following figure, adjust each frontside position of the outer rails on both sides (left and right) so that the distance from the surface of the rack to the tip of the rail becomes within the range of 50 to 55 millimeters. 14. Fully tighten the eight screws (B4 x 8) fixing the four rail brackets. Tightening torque: 120 x 10_2 N . m {12.2 kgf . cm} Rack Rail bracket Outer rail 50 to 55 mm Rack angle B4 x 8 1-6 HDW-2000/M2000/M2000P/S2000/S2000P/M2100/M2100P, DVW-2000/2000P/M2000/M2000P MSW-2000/A2000/A2000P/M2000/M2000P/M2000E/M2000EP/M2100/M2100P/M2100E/M2100EP
-
 1
1 -
2
-
3
-
4
-
5
-
6
-
 7
7 -
 8
8 -
 9
9 -
 10
10 -
 11
11 -
 12
12 -
 13
13 -
 14
14 -
 15
15 -
 16
16 -
 17
17 -
18
-
19
-
20
-
21
-
22
-
23
-
24
-
25
-
26
-
27
-
28
-
29
-
30
-
31
-
32
-
33
-
34
-
35
-
36
-
37
-
38
-
39
-
40
-
41
-
42
-
43
-
44
-
45
-
46
-
47
-
48
 |
 |