Sony VGX-XL2 User Guide (Computer Component) - Page 134
Restore Complete System, Restart, Create recovery discs, Go to Restore C: Drive
 |
View all Sony VGX-XL2 manuals
Add to My Manuals
Save this manual to your list of manuals |
Page 134 highlights
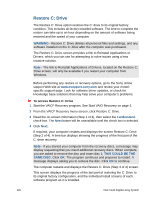
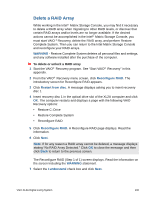
Before performing any restore or recovery options, go to the Sony online support Web site at www.esupport.sony.com and review your modelspecific support page. To access Restore Complete System 1 Start the VAIO® Recovery program. 2 From the VAIO® Recovery menu screen, click Restore Complete System. The introductory screen for Restore Complete System appears. Read the onscreen information. 3 Click Restart from disc if you have the recovery discs available; if not, click Create recovery discs and return to this screen when complete. 4 Insert the first recovery disc in the optical drive slot and click OK. Your computer restarts and displays a screen with the following options: • Restore C: Drive • Restore Complete System • Reconfigure RAID 5 Click Restore Complete System. The screen Restore Complete System (Step 1 of 5) appears. Carefully read the information on the screen. This screen provides the link Go to Restore C: Drive, which allows you to try a less invasive alternative to solve a potential problem other than Restore Complete System. 6 Select the Keep the Recovery Drive [Recommended] check box, if desired. 7 Select the I understand check box. The Next button becomes available. 8 Click Next. Note: If you chose not to keep the current recovery drive, you will skip the Restore Complete System (Step 2 of 5) screen and move directly to the Restore Complete System (Step 3 of 5) screen. When the recovery process completes, remove the disc and click OK (Step 9). The recovery process starts and the screen Restore Complete System (Step 2 of 5) appears, which displays a time bar showing the progress of this step. 131 VGX-XL2A Digital Living System
-
 1
1 -
2
-
3
-
4
-
5
-
6
-
7
-
8
-
9
-
10
-
11
-
12
-
13
-
14
-
15
-
16
-
17
-
18
-
19
-
20
-
21
-
22
-
23
-
24
-
25
-
26
-
27
-
28
-
29
-
30
-
31
-
32
-
33
-
34
-
35
-
36
-
37
-
38
-
39
-
40
-
41
-
42
-
43
-
44
-
45
-
46
-
47
-
48
-
49
-
50
-
51
-
52
-
53
-
54
-
55
-
56
-
57
-
58
-
59
-
60
-
61
-
62
-
63
-
64
-
65
-
66
-
67
-
68
-
69
-
70
-
71
-
72
-
73
-
74
-
75
-
76
-
77
-
78
-
79
-
80
-
81
-
82
-
83
-
84
-
85
-
86
-
87
-
88
-
89
-
90
-
91
-
92
-
93
-
94
-
95
-
96
-
97
-
98
-
99
-
100
-
101
-
102
-
103
-
104
-
105
-
106
-
107
-
108
-
109
-
110
-
111
-
112
-
113
-
114
-
115
-
116
-
117
-
118
-
119
-
120
-
121
-
122
-
123
-
124
-
125
-
126
-
127
-
128
-
 129
129 -
 130
130 -
 131
131 -
 132
132 -
 133
133 -
 134
134 -
 135
135 -
 136
136 -
 137
137 -
 138
138 -
 139
139 -
140
-
141
-
142
-
143
-
144
-
145
-
146
-
147
-
148
-
149
-
150
-
151
-
152
-
153
-
154
-
155
-
156
-
157
-
158
-
159
-
160
-
161
-
162
-
163
-
164
-
165
-
166
-
167
-
168
-
169
-
170
-
171
-
172
-
173
-
174
-
175
-
176
-
177
-
178
-
179
-
180
-
181
-
182
 |
 |
