Sony VGX-XL2 User Guide (Computer Component) - Page 160
Performance and Maintenance > System, Roll Back Driver - bios updates
 |
View all Sony VGX-XL2 manuals
Add to My Manuals
Save this manual to your list of manuals |
Page 160 highlights
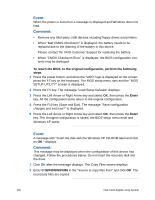
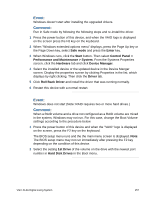
Event: Windows doesn't start after installing the upgraded drivers. Comment: Run in Safe mode by following the following steps and re-install the driver. 1 Press the power button of this device, and when the VAIO logo is displayed on the screen press the F8 key on the keyboard. 2 When "Windows extended options menu" displays, press the Page Up key or the Page Down key, select Safe mode and press the Enter key. 3 When Windows runs, click the Start button. Then select Control Panel > Performance and Maintenance > System. From the Systems Properties screen, click the Hardware tab and click Device Manager. 4 Select the installed device or the updated device in the Device Manger screen. Display the properties screen by clicking Properties in the list, which displays by right clicking. Then click the Driver tab. 5 Click Roll Back Driver and install the driver that was running normally. 6 Restart this device with a normal restart. Event: Windows does not start (Note: RAID requires two or more hard drives.) Comment: When a RAID volume and a drive not configured as a RAID volume are mixed in the system, Windows may not run. For this case, change the Boot Volume settings according to the procedure below. 1 Press the power button of this device and when the "VAIO" logo is displayed on the screen, press the F2 key on the keyboard. The BIOS setup menu runs and the the main menu screen is displayed. Note: The BIOS setup menu may not run immediately after pressing the F2 key depending on the condition of this device. 2 Select the setting 1st Drive of the volume on the drive with the newest port number in Hard Disk Drives in the Boot menu. VGX-XL2A Digital Living System 157
-
 1
1 -
2
-
3
-
4
-
5
-
6
-
7
-
8
-
9
-
10
-
11
-
12
-
13
-
14
-
15
-
16
-
17
-
18
-
19
-
20
-
21
-
22
-
23
-
24
-
25
-
26
-
27
-
28
-
29
-
30
-
31
-
32
-
33
-
34
-
35
-
36
-
37
-
38
-
39
-
40
-
41
-
42
-
43
-
44
-
45
-
46
-
47
-
48
-
49
-
50
-
51
-
52
-
53
-
54
-
55
-
56
-
57
-
58
-
59
-
60
-
61
-
62
-
63
-
64
-
65
-
66
-
67
-
68
-
69
-
70
-
71
-
72
-
73
-
74
-
75
-
76
-
77
-
78
-
79
-
80
-
81
-
82
-
83
-
84
-
85
-
86
-
87
-
88
-
89
-
90
-
91
-
92
-
93
-
94
-
95
-
96
-
97
-
98
-
99
-
100
-
101
-
102
-
103
-
104
-
105
-
106
-
107
-
108
-
109
-
110
-
111
-
112
-
113
-
114
-
115
-
116
-
117
-
118
-
119
-
120
-
121
-
122
-
123
-
124
-
125
-
126
-
127
-
128
-
129
-
130
-
131
-
132
-
133
-
134
-
135
-
136
-
137
-
138
-
139
-
140
-
141
-
142
-
143
-
144
-
145
-
146
-
147
-
148
-
149
-
150
-
151
-
152
-
153
-
154
-
 155
155 -
 156
156 -
 157
157 -
 158
158 -
 159
159 -
 160
160 -
 161
161 -
 162
162 -
 163
163 -
 164
164 -
 165
165 -
166
-
167
-
168
-
169
-
170
-
171
-
172
-
173
-
174
-
175
-
176
-
177
-
178
-
179
-
180
-
181
-
182
 |
 |