Sony VGX-XL2 User Guide (Computer Component) - Page 67
Key is Provided Automatically, Wireless Network Connections
 |
View all Sony VGX-XL2 manuals
Add to My Manuals
Save this manual to your list of manuals |
Page 67 highlights
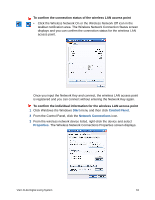
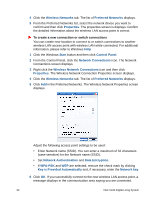
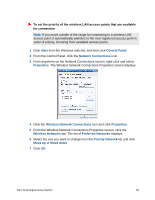
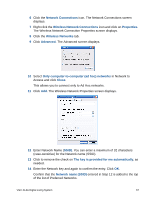
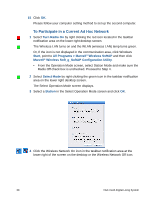
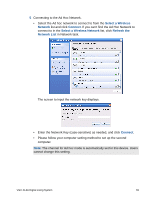
4 Click the Wireless Networks tab. The list of Preferred Networks displays. 5 From the Preferred Networks list, select the network device you want to confirm and then click Properties. The properties screen is displays. Confirm the detailed information about the wireless LAN access point is correct. To create a new connection or switch connections You can create new location to connect to or switch connections to another wireless LAN access point with wireless LAN while connected. For additional information, please refer to Windows Help 1 Click the Windows Start button and then click Control Panel. 2 From the Control Panel, click the Network Connections icon. The Network Connections screen displays. 3 Right click the Wireless Network Connections icon and then click Properties. The Wireless Network Connection Properties screen displays. 4 Click the Wireless Networks tab. The list of Preferred Networks displays. 5 Click Add in the Preferred Networks. The Wireless Network Properties screen displays. Adjust the following access point settings to be used: • Enter Network name (SSID). You can enter a maximum of 32 characters (case-sensitive) for the Network name (SSID). • Set Network Authentication and Data Encryption. • If WPA-PSK and WEP are selected, remove the check mark by clicking Key is Provided Automatically and, if necessary, enter the Network key. 6 Click OK. If you successfully connect to the new wireless LAN access point, a message displays in the communication area saying you are connected. 64 VGX-XL2A Digital Living System
-
 1
1 -
2
-
3
-
4
-
5
-
6
-
7
-
8
-
9
-
10
-
11
-
12
-
13
-
14
-
15
-
16
-
17
-
18
-
19
-
20
-
21
-
22
-
23
-
24
-
25
-
26
-
27
-
28
-
29
-
30
-
31
-
32
-
33
-
34
-
35
-
36
-
37
-
38
-
39
-
40
-
41
-
42
-
43
-
44
-
45
-
46
-
47
-
48
-
49
-
50
-
51
-
52
-
53
-
54
-
55
-
56
-
57
-
58
-
59
-
60
-
61
-
 62
62 -
 63
63 -
 64
64 -
 65
65 -
 66
66 -
 67
67 -
 68
68 -
 69
69 -
 70
70 -
 71
71 -
 72
72 -
73
-
74
-
75
-
76
-
77
-
78
-
79
-
80
-
81
-
82
-
83
-
84
-
85
-
86
-
87
-
88
-
89
-
90
-
91
-
92
-
93
-
94
-
95
-
96
-
97
-
98
-
99
-
100
-
101
-
102
-
103
-
104
-
105
-
106
-
107
-
108
-
109
-
110
-
111
-
112
-
113
-
114
-
115
-
116
-
117
-
118
-
119
-
120
-
121
-
122
-
123
-
124
-
125
-
126
-
127
-
128
-
129
-
130
-
131
-
132
-
133
-
134
-
135
-
136
-
137
-
138
-
139
-
140
-
141
-
142
-
143
-
144
-
145
-
146
-
147
-
148
-
149
-
150
-
151
-
152
-
153
-
154
-
155
-
156
-
157
-
158
-
159
-
160
-
161
-
162
-
163
-
164
-
165
-
166
-
167
-
168
-
169
-
170
-
171
-
172
-
173
-
174
-
175
-
176
-
177
-
178
-
179
-
180
-
181
-
182
 |
 |
