Sony VGX-XL2 User Guide (Computer Component) - Page 149
Con a RAID Array, Before You Begin, Install Additional Hard Disc Drives - motherboard
 |
View all Sony VGX-XL2 manuals
Add to My Manuals
Save this manual to your list of manuals |
Page 149 highlights
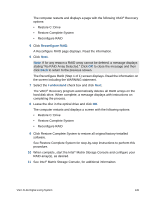
Configure a RAID Array Certain VAIO® computers can be ordered for purchase already configured for RAID 0, RAID 1, RAID 5, or RAID 10. The number of pre installed SATA disk drives vary depending on the RAID level purchased. See your computer's specification sheet for details about your specific hardware configuration. Note: When installing additional disk drives, make sure that you use identical S-ATA drives, when possible. If you install drives that vary in size, storage capacity will be limited to the size of the smallest drive. Before You Begin To configure your RAID array, perform the following steps 1 Back up your computer's data to external media. Creating, altering, or configuring for RAID deletes all data from the targeted hard disk drives. 2 Create the VAIO® Recovery Discs media. The discs are required to recover your data files after you configure the RAID volumes to perform a hard disk recovery. For additional information about creating recovery discs, see the VAIO® Recovery Guide located in VAIO® Support Central. To access the online documentation 1 Using the wireless keyboard, click Start in the Windows® taskbar, then click All Programs > VAIO® Support Central. 2 From the VAIO® Support Central page, select VAIO® Documentation, and then select the desired document from the list. Install Additional Hard Disc Drives If you purchased a RAID Ready computer, you may be required to install additional hard disks to configure the RAID array to the desired level. In addition to the procedure here, you can locate additional procedures for installing hard disks in the section titled "About Hard Disk Drive Installation" of the VAIO® Computer User's Guide. To install additional hard disk drives 1 Place all S-ATA disk drives into the drive holder inside the computer's chassis. 2 Connect one end of the S-ATA data cable(s) to the S-ATA connection, starting with Port-0 on the motherboard. Connect the data cables of any additional disks to Ports 1 and 2. 146 VGX-XL2A Digital Living System
-
 1
1 -
2
-
3
-
4
-
5
-
6
-
7
-
8
-
9
-
10
-
11
-
12
-
13
-
14
-
15
-
16
-
17
-
18
-
19
-
20
-
21
-
22
-
23
-
24
-
25
-
26
-
27
-
28
-
29
-
30
-
31
-
32
-
33
-
34
-
35
-
36
-
37
-
38
-
39
-
40
-
41
-
42
-
43
-
44
-
45
-
46
-
47
-
48
-
49
-
50
-
51
-
52
-
53
-
54
-
55
-
56
-
57
-
58
-
59
-
60
-
61
-
62
-
63
-
64
-
65
-
66
-
67
-
68
-
69
-
70
-
71
-
72
-
73
-
74
-
75
-
76
-
77
-
78
-
79
-
80
-
81
-
82
-
83
-
84
-
85
-
86
-
87
-
88
-
89
-
90
-
91
-
92
-
93
-
94
-
95
-
96
-
97
-
98
-
99
-
100
-
101
-
102
-
103
-
104
-
105
-
106
-
107
-
108
-
109
-
110
-
111
-
112
-
113
-
114
-
115
-
116
-
117
-
118
-
119
-
120
-
121
-
122
-
123
-
124
-
125
-
126
-
127
-
128
-
129
-
130
-
131
-
132
-
133
-
134
-
135
-
136
-
137
-
138
-
139
-
140
-
141
-
142
-
143
-
 144
144 -
 145
145 -
 146
146 -
 147
147 -
 148
148 -
 149
149 -
 150
150 -
 151
151 -
 152
152 -
 153
153 -
 154
154 -
155
-
156
-
157
-
158
-
159
-
160
-
161
-
162
-
163
-
164
-
165
-
166
-
167
-
168
-
169
-
170
-
171
-
172
-
173
-
174
-
175
-
176
-
177
-
178
-
179
-
180
-
181
-
182
 |
 |
