Sony VGX-XL2 User Guide (Computer Component) - Page 64
Communicate Using Infrastructure Mode, Wireless LAN Access Point - vgx xl2a manuals
 |
View all Sony VGX-XL2 manuals
Add to My Manuals
Save this manual to your list of manuals |
Page 64 highlights
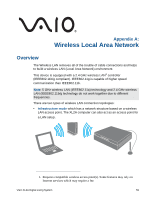
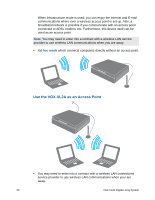
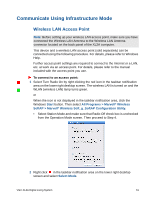
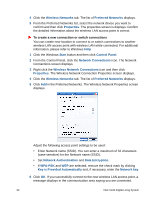
Communicate Using Infrastructure Mode Wireless LAN Access Point Note: Before setting up your wireless LAN access point, make sure you have connected the Wireless LAN Antenna to the Wireless LAN Antenna connector located on the back panel of the XL2A computer. This device and a wireless LAN access point (sold separately) can be connected using the following procedure. For details, please refer to Windows Help. Further access point settings are required to connect to the Internet or a LAN, etc. at work via an access point. For details, please refer to the manual included with the access point you use. To connect to an access point: 1 Select Turn Radio On by right clicking the red icon in the taskbar notification area on the lower right desktop screen. The wireless LAN is turned on and the WLAN (wireless LAN) lamp turns green. or When the icon is not displayed in the taskbar notification area, click the Windows Start button. Then select All Programs > Marvell® Wireless SoftAP > Marvell® Wireless Soft_g_SoftAP Configuration Utility. • Select Station Mode and make sure that Radio Off check box is unchecked from the Operation Mode screen. Then proceed to Step 4. 2 Right click in the taskbar notification area on the lower right desktop screen and select Select Mode. VGX-XL2A Digital Living System 61
-
 1
1 -
2
-
3
-
4
-
5
-
6
-
7
-
8
-
9
-
10
-
11
-
12
-
13
-
14
-
15
-
16
-
17
-
18
-
19
-
20
-
21
-
22
-
23
-
24
-
25
-
26
-
27
-
28
-
29
-
30
-
31
-
32
-
33
-
34
-
35
-
36
-
37
-
38
-
39
-
40
-
41
-
42
-
43
-
44
-
45
-
46
-
47
-
48
-
49
-
50
-
51
-
52
-
53
-
54
-
55
-
56
-
57
-
58
-
 59
59 -
 60
60 -
 61
61 -
 62
62 -
 63
63 -
 64
64 -
 65
65 -
 66
66 -
 67
67 -
 68
68 -
 69
69 -
70
-
71
-
72
-
73
-
74
-
75
-
76
-
77
-
78
-
79
-
80
-
81
-
82
-
83
-
84
-
85
-
86
-
87
-
88
-
89
-
90
-
91
-
92
-
93
-
94
-
95
-
96
-
97
-
98
-
99
-
100
-
101
-
102
-
103
-
104
-
105
-
106
-
107
-
108
-
109
-
110
-
111
-
112
-
113
-
114
-
115
-
116
-
117
-
118
-
119
-
120
-
121
-
122
-
123
-
124
-
125
-
126
-
127
-
128
-
129
-
130
-
131
-
132
-
133
-
134
-
135
-
136
-
137
-
138
-
139
-
140
-
141
-
142
-
143
-
144
-
145
-
146
-
147
-
148
-
149
-
150
-
151
-
152
-
153
-
154
-
155
-
156
-
157
-
158
-
159
-
160
-
161
-
162
-
163
-
164
-
165
-
166
-
167
-
168
-
169
-
170
-
171
-
172
-
173
-
174
-
175
-
176
-
177
-
178
-
179
-
180
-
181
-
182
 |
 |
