Symantec 16-00-00091 Installation Guide - Page 43
Advanced PPPoE, Update Fields, Connections, Connect on Demand, Connect, Idle Time Out, Choose
 |
UPC - 037648211703
View all Symantec 16-00-00091 manuals
Add to My Manuals
Save this manual to your list of manuals |
Page 43 highlights
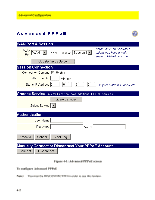
Advanced PPPoE 1. Select the WAN Port from the WAN Port drop down list. 2. If you have a multi-session PPPoE account select the appropriate session from the PPPoE Session drop down list. Repeat the following steps for each PPPoE session. If you have a single session PPPoE account, leave the PPPoE session at Session 1. 3. Click Update Fields. 4. Use the Connections section to specify whether you connect or disconnect your PPPoE account manually or automatically. a. The Connect on Demand is enabled by default, which means the Symantec Firewall/ VPN will connect automatically when an Internet request is made (like browsing a web site). If you want to connect manually, disable the check box and connect by clicking Connect. b. In the Idle Time Out, field enter the number of minutes of inactivity after which you want the Symantec Firewall/VPN to disconnect the PPPoE connection. c. Enter 0 to keep the connection always on and to prevent the Symantec Firewall/VPN from ever hanging up. If the value is more than 0, enable Connect on Demand to redial automatically when needed. d. If you have a Static IP PPPoE Internet account, enter the IP address in the Static IP Address field, otherwise leave the value at zero. Note: This is for PPPoE only! 5. If your ISP has different services available for your PPPoE account, use the Choose Services section to access them. a. Click Query Services. b. Select the service from the drop down list, then connect as normal. 6. Enter your User Name. 7. Enter your Password. 8. Verify your Password. 9. Click Save All to process the screen. 4-3
-
 1
1 -
2
-
3
-
4
-
5
-
6
-
7
-
8
-
9
-
10
-
11
-
12
-
13
-
14
-
15
-
16
-
17
-
18
-
19
-
20
-
21
-
22
-
23
-
24
-
25
-
26
-
27
-
28
-
29
-
30
-
31
-
32
-
33
-
34
-
35
-
36
-
37
-
 38
38 -
 39
39 -
 40
40 -
 41
41 -
 42
42 -
 43
43 -
 44
44 -
 45
45 -
 46
46 -
 47
47 -
 48
48 -
49
-
50
-
51
-
52
-
53
-
54
-
55
-
56
-
57
-
58
-
59
-
60
-
61
-
62
-
63
-
64
-
65
-
66
-
67
-
68
-
69
-
70
-
71
-
72
-
73
-
74
-
75
-
76
-
77
-
78
-
79
-
80
-
81
-
82
-
83
-
84
-
85
-
86
-
87
-
88
-
89
-
90
-
91
-
92
-
93
-
94
-
95
-
96
-
97
-
98
-
99
-
100
-
101
-
102
-
103
-
104
-
105
-
106
-
107
-
108
-
109
-
110
-
111
-
112
-
113
-
114
-
115
-
116
-
117
-
118
-
119
-
120
 |
 |
