Synology DS720 Synology NAS Users Guide - Based on DSM 7.1 - Page 21
Create local users and groups, Create a user
 |
View all Synology DS720 manuals
Add to My Manuals
Save this manual to your list of manuals |
Page 21 highlights
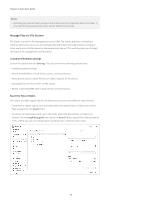
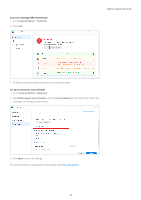
In addition to package installation, you can configure package-related settings, including autoupdate, and package sources in Package Center. For more information on the advanced settings of Package Center, please refer to this article. Chapter 2: Quick Start Guide 2.10 Create local users and groups You can grant family members or business associates access to Synology NAS by creating user accounts for them. For the ease of administration, you can create groups to categorize users and manage them together. This section guides you through how to create users and groups in Control Panel. Create a user 1. Go to Control Panel > User & Group > User. 2. Click Create to launch User Creation Wizard. 3. On the Enter user information page, enter the following user information: • Name • Description (Optional) • Email (Optional): Enter the user's email address. System notifications, such as password reset messages, will be sent to the address specified here. • Password • Confirm password 4. On the same page, configure the following advanced settings that will be applied to the user: • Send a notification mail to the newly created user: You have to enable email notifications in Control Panel > Notification > Email to allow the system to send emails. If you have not yet set up notification settings, a confirmation dialog box will pop up and lead you to the setup page when you tick this checkbox. For more information on the notification settings, please refer to the Manage notifications section. • Display user password in notification mail • Disallow the user to change account password • Password is always valid: You will not see this option If Password Expiration at the Advanced tab is not enabled. This option makes this user's password always valid and the rules of Password Expiration will not be applied to this user. 5. On the Join groups page, specify the groups to which the new user should belong. The default groups are administrators, http, and users. Please refer to the Create a group section to customize groups. 18
-
 1
1 -
2
-
3
-
4
-
5
-
6
-
7
-
8
-
9
-
10
-
11
-
12
-
13
-
14
-
15
-
 16
16 -
 17
17 -
 18
18 -
 19
19 -
 20
20 -
 21
21 -
 22
22 -
 23
23 -
 24
24 -
 25
25 -
 26
26 -
27
-
28
-
29
-
30
-
31
-
32
-
33
-
34
-
35
-
36
-
37
-
38
-
39
-
40
-
41
-
42
-
43
-
44
-
45
-
46
-
47
-
48
-
49
-
50
-
51
-
52
-
53
-
54
-
55
-
56
-
57
-
58
-
59
-
60
-
61
-
62
-
63
-
64
-
65
-
66
-
67
-
68
-
69
-
70
-
71
-
72
-
73
-
74
-
75
-
76
-
77
-
78
-
79
-
80
-
81
-
82
-
83
 |
 |
