Synology DS720 Synology NAS Users Guide - Based on DSM 7.1 - Page 36
Storage Pools and Volumes, Hot Spare, Storage Pool, Volume, this article
 |
View all Synology DS720 manuals
Add to My Manuals
Save this manual to your list of manuals |
Page 36 highlights
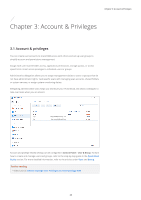
Chapter 4: Storage & Virtualization Storage Pools and Volumes Create at least one storage pool and volume to start storing data on your Synology NAS. For more information, refer to the instructions in Chapter 2.7. You can go to Storage Manager > Overview to find key information about your storage system, such as overall system status, volume usage, drive information, and scheduled tasks. View and manage all your storage pools and volumes at Storage Manager > Storage. The actions you can perform here depend on your Synology NAS model and configurations: • Change the RAID type of a storage pool without losing existing data. • Convert a storage pool from single-volume support to multiple-volume support. • Add or replace drives to expand the capacity of a storage pool and volume. • Enable SSD TRIM to optimize the performance of an SSD-only storage pool. • Perform or schedule data scrubbing on a storage pool to maintain data consistency. • Perform file system defragmentation to improve a volume's file access performance. Further reading • For more information, refer to the articles under Storage Pool and Volume. Hot Spare Hot spare drives are standby drives that allow your Synology NAS to automatically repair degraded storage pools. You can assign hot spare drives to protect storage pools with a drive fault tolerance of one or more drives at Storage Manager > Storage > Hot Spare. When a drive crashes and causes a storage pool to degrade, the hot spare drive replaces the crashed drive, allowing the storage pool to recover. For more information, refer to this article. 33
-
 1
1 -
2
-
3
-
4
-
5
-
6
-
7
-
8
-
9
-
10
-
11
-
12
-
13
-
14
-
15
-
16
-
17
-
18
-
19
-
20
-
21
-
22
-
23
-
24
-
25
-
26
-
27
-
28
-
29
-
30
-
 31
31 -
 32
32 -
 33
33 -
 34
34 -
 35
35 -
 36
36 -
 37
37 -
 38
38 -
 39
39 -
 40
40 -
 41
41 -
42
-
43
-
44
-
45
-
46
-
47
-
48
-
49
-
50
-
51
-
52
-
53
-
54
-
55
-
56
-
57
-
58
-
59
-
60
-
61
-
62
-
63
-
64
-
65
-
66
-
67
-
68
-
69
-
70
-
71
-
72
-
73
-
74
-
75
-
76
-
77
-
78
-
79
-
80
-
81
-
82
-
83
 |
 |
