TASCAM BD-MP4K Owners Manual - Page 12
Rear panel, Button combination operations in Shift Mode
 |
View all TASCAM BD-MP4K manuals
Add to My Manuals
Save this manual to your list of manuals |
Page 12 highlights
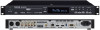
Button combination operations in Shift Mode Buttons on the unit Button operation SHIFT - Press simultaneously SHIFT 8 Press simultaneously SHIFT y Press simultaneously SHIFT 9 Press simultaneously SHIFT m Press simultaneously SHIFT , Press simultaneously Function Set the lock function. Confirm (or execute). j (cursor down) k (cursor up) l (cursor left) ; (cursor right) Rear panel Buttons on the unit Button operation 7 8 Press simultaneously 7 9 Press simultaneously Function Open the Home Screen. Open the disc top menu. 7 m Press simultaneously Open the Repeat Menu. 7 , Press simultaneously Set A-B repeat. we r t y u i op a w ANALOG OUT (BALANCED) L/R jacks These are balanced XLR analog output jacks. These transmit audio signals to external speakers and amplifiers, for example. Use XLR cables for connection. e ANALOG OUT (UNBALANCED) L/R jacks These are unbalanced RCA analog output jacks. These transmit audio signals to external speakers and amplifiers, for example. Use RCA cables for connection. r 7.1 CH OUT (UNBALANCED) jacks These are unbalanced RCA analog jacks for 7.1 channel output. These transmit 8 channels of audio signals to a 7.1 surround system. Use RCA cables for connection. t DIGITAL OUT (COAXIAL) connector This is a coaxial digital audio output connector. These transmit digital audio signals to external speakers and amplifiers, for example. Use a coaxial cable (75Ω) for connection. y ETHERNET port This is an Ethernet port. Use to connect this unit to a network, play files on network drives and control it remotely from a computer. Moreover, BD-Live contents can be accessed by connecting to the Internet. Use an STP cable that is category 5e or higher for connection. u HDMI VIDEO/AUDIO port Audio and video signals are transmitted from this HDMI port. Use an HDMI cable for connection. NOTE iiWhen using 4K UHD BD, 2160p 60Hz or other high-definition video, connect a monitor that supports the resolution using a premium high-speed HDMI cable that supports 18 Gbps. iiWhen using 2160p 30Hz or 3D video, connect a monitor that supports the resolution using a high-speed HDMI cable or a premium high-speed HDMI cable. iiWhen the HDMI VIDEO/AUDIO connector is connected to an AV amp that does not support HDMI 2.0, 4K output is not possible even if a monitor is connected to a through output of the AV amplifier. i HDMI AUDIO ONLY port Audio signals are transmitted from this HDMI port. Video signals are not transmitted from this port. Use an HDMI cable for connection. NOTE ii When using an AV amplifier that does not support HDMI 2.0, connect it to this port. ii If a monitor is connected to this port, the following message will appear. "This HDMI is audio only. Please connect to the Amplifier!" o USB 3.0 port Connect/disconnect USB flash drives here. Files, including video and music files, on the inserted USB flash drive can be played back. Moreover, this can be used to load update files for firmware updates. ATTENTION Do not connect anything to the USB port when using an SD card to conduct a firmware update. Do not insert an SD card in the SD card slot when using a USB flash drive to conduct a firmware update. p RS-232C connector This is a 9-pin D-sub RS-232C control input/output connector. A computer can be used to control this unit by connecting to it with an RS-232C cable. a AC IN connector Connect the included power cord here. ATTENTION Always use the included cord to supply power to this unit. Use of a different one could cause malfunction, fire or electric shock. 12 TASCAM BD-MP4K
-
 1
1 -
2
-
3
-
4
-
5
-
6
-
 7
7 -
 8
8 -
 9
9 -
 10
10 -
 11
11 -
 12
12 -
 13
13 -
 14
14 -
 15
15 -
 16
16 -
 17
17 -
18
-
19
-
20
-
21
-
22
-
23
-
24
-
25
-
26
-
27
-
28
-
29
-
30
-
31
-
32
-
33
-
34
-
35
-
36
-
37
-
38
-
39
-
40
-
41
-
42
-
43
-
44
-
45
-
46
-
47
-
48
-
49
-
50
-
51
-
52
-
53
-
54
-
55
-
56
-
57
-
58
-
59
-
60
-
61
-
62
-
63
-
64
-
65
-
66
-
67
-
68
-
69
-
70
-
71
-
72
-
73
-
74
-
75
-
76
-
77
-
78
-
79
-
80
-
81
-
82
-
83
-
84
-
85
-
86
-
87
-
88
-
89
-
90
-
91
-
92
-
93
-
94
-
95
-
96
-
97
-
98
-
99
-
100
-
101
-
102
-
103
-
104
-
105
-
106
-
107
-
108
-
109
-
110
-
111
-
112
-
113
-
114
-
115
-
116
-
117
-
118
-
119
-
120
-
121
-
122
-
123
-
124
-
125
-
126
-
127
-
128
-
129
-
130
-
131
-
132
-
133
-
134
-
135
-
136
-
137
-
138
-
139
-
140
-
141
-
142
-
143
-
144
-
145
-
146
-
147
-
148
-
149
-
150
-
151
-
152
-
153
-
154
-
155
-
156
-
157
-
158
-
159
-
160
-
161
-
162
-
163
-
164
-
165
-
166
-
167
-
168
-
169
-
170
-
171
-
172
-
173
-
174
-
175
-
176
-
177
-
178
-
179
-
180
-
181
-
182
-
183
-
184
-
185
-
186
-
187
-
188
-
189
-
190
-
191
-
192
-
193
-
194
-
195
-
196
-
197
-
198
-
199
-
200
-
201
-
202
-
203
-
204
-
205
-
206
-
207
-
208
-
209
-
210
-
211
-
212
-
213
-
214
-
215
-
216
-
217
-
218
-
219
-
220
-
221
-
222
-
223
-
224
-
225
-
226
-
227
-
228
-
229
-
230
-
231
-
232
-
233
-
234
-
235
-
236
-
237
-
238
-
239
-
240
-
241
-
242
-
243
-
244
-
245
-
246
-
247
-
248
-
249
-
250
-
251
-
252
-
253
-
254
-
255
-
256
-
257
-
258
-
259
-
260
 |
 |
