TRENDnet TEW-723BRM Users Guide - Page 26
Set your router date and time, Manually con your Internet connection
 |
View all TRENDnet TEW-723BRM manuals
Add to My Manuals
Save this manual to your list of manuals |
Page 26 highlights
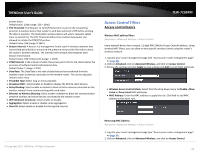
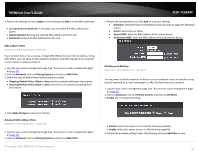
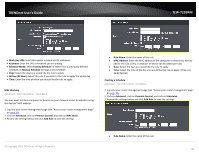
TRENDnet User's Guide Set your router date and time Setup > Time and Date There are two ways to set the router's date and time. NTP (Network Time Protocol) is based on time servers. You can also manually set the router's date and time. Note: It is important that the time is configured correctly before setting any schedules. Oour router management page http://192.168.10.1 is accessed through the use of your Internet web browser (e.g. Internet Explorer, Firefox, Chrome, Safari, Opera) and will be referenced frequently in this User's Guide. 1. Log into your router management page (see "Access your router management page" on page 23). 2. Click on Setup, and click on Time and Date. 3. Review the settings and click Apply Changes to save the settings. TEW-723BRM • State: Select Enable to enable the NTP feature • Server / Server2: Select the server you wish to connect to. To change the default server, select Other from the drop down menu and click Apply Changes. Input the server destination in the additional field below. • Interval: How often the modem router syncs with the designated server.. • System Time: Displays the current time of the modem router. If the Mode, is set as Set Time Manually, then the time can be customized in this area. • Time Zone: Select your country's time zone from the drop down menu. • DayLight: Select day light savings time for your area. • Mode: o Set Time Manually: Manually set the time of the modem router o Copy Computer Time: Automatically syncs the time that is currently on computer to the modem router. o Set NTP Server Manually: Connects your modem router to a designated server to sync the times NTP 1. Review the settings below and click Apply to save settings. © Copyright 2015 TRENDnet. All Rights Reserved. Manually configure your Internet connection Setup > Internet Setup> Channel Config 1. Log into your router management page (see "Access your router management page" on page 23). 2. Click on Setup, and click on Channel Config. 3. The device supports multiple WAN types, select the WAN type you would like to configure and click Add to continue. Note: Please contact your ISP to determine all configuration settings. PPPoE / PPPoA If you select PPPoE (RFC-2516 PPP over Ethernet) on the Protocol section, the screen below is displayed. • IP Protocol: Select IPv4, IPv6, or IPv4/IPv6 • User Name: Enter the user name provided by your ISP. 23
-
 1
1 -
2
-
3
-
4
-
5
-
6
-
7
-
8
-
9
-
10
-
11
-
12
-
13
-
14
-
15
-
16
-
17
-
18
-
19
-
20
-
 21
21 -
 22
22 -
 23
23 -
 24
24 -
 25
25 -
 26
26 -
 27
27 -
 28
28 -
 29
29 -
 30
30 -
 31
31 -
32
-
33
-
34
-
35
-
36
-
37
-
38
-
39
-
40
-
41
-
42
-
43
-
44
-
45
-
46
-
47
-
48
-
49
-
50
-
51
-
52
-
53
-
54
-
55
-
56
-
57
-
58
-
59
-
60
-
61
 |
 |
