TRENDnet TEW-828DRU User's Guide - Page 15
Schedule, Add New, Time Settings, Create Schedules
 |
View all TRENDnet TEW-828DRU manuals
Add to My Manuals
Save this manual to your list of manuals |
Page 15 highlights
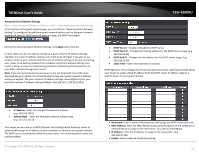
TRENDnet User's Guide Enabling Auto 20/40MHz or Auto 20/40/80 MHz typically results in substantial performance increases when connecting an 802.11ac/n wireless client. Schedule: The schedule function allows you to define a schedule when the wireless should be turned on. To define a new schedule, click Add New and refer to page 36 " Create Schedules". After you have created a new schedule, you will be returned to the page to apply the new schedule. If you encounter issues, click the drop-down list and the new schedule will be available for selection. Note: Before applying scheduling, please ensure your Time settings are configured correct and you have defined a schedule. See page 35 to configure Time Settings and see page 36 " Create Schedules" to create a schedule. © Copyright 2015 TRENDnet. All Rights Reserved. TEW-828DRU 12
-
 1
1 -
2
-
3
-
4
-
5
-
6
-
7
-
8
-
9
-
 10
10 -
 11
11 -
 12
12 -
 13
13 -
 14
14 -
 15
15 -
 16
16 -
 17
17 -
 18
18 -
 19
19 -
 20
20 -
21
-
22
-
23
-
24
-
25
-
26
-
27
-
28
-
29
-
30
-
31
-
32
-
33
-
34
-
35
-
36
-
37
-
38
-
39
-
40
-
41
-
42
-
43
-
44
-
45
-
46
-
47
-
48
-
49
-
50
-
51
-
52
-
53
-
54
-
55
-
56
-
57
-
58
-
59
-
60
-
61
-
62
-
63
-
64
-
65
-
66
-
67
-
68
-
69
-
70
-
71
-
72
 |
 |
