Thermador PRG366EG User Manual - Page 22
Disassembly/Assembly of, the Grill, CAUTION
 |
View all Thermador PRG366EG manuals
Add to My Manuals
Save this manual to your list of manuals |
Page 22 highlights
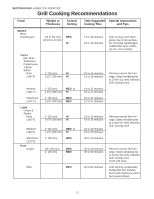
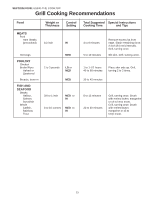
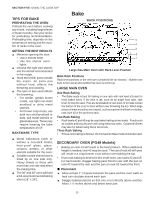
SECTION FOUR: USING THE COOKTOP Disassembly/Assembly of the Grill CAUTION: • Use extreme care when placing the grill components into the grill compartment. Avoid contacting the ceramic igniter which could break preventing operation of the grill. • The grill must be assembled as shown. The drip tray heat shields must be in place, and the burner must be properly positioned relative to the gas supply. Incorrect assembly of the grill may result in unsafe or hazardous conditions during operation. • The grill radiant must be in place for proper operation of the grill. • Do not leave the grill unattended while in use. • Do not use charcoal briquettes or coals of any kind. Follow the steps below to disassemble the components in the grill box. A. Remove the grill grate, stainless steel radiant and burner from the grill box. B. Remove the heat deflector from the slots on the front panel of the grill box. C. Remove the rectangular drip pan inside the grill box as shown below. Re-assembly A. Replace the drip pan and heat deflector. B. Insert the end of the burner into the slots at the back of the grill box. Insert the tab on front of the burner into slot in the heat deflector. C. The stainless steel radiant lies on two (2) studs on each end of the grill can. D. Place the grill grate, with raised food containment rail oriented towards the grill box rear. Exploded Views and Side View of Grill Grill Grate Stainless Steel Radiant U-shaped burner Heat Deflector Grill Box Drip Pan Burner Placement in slots in back of grill 20
-
 1
1 -
2
-
3
-
4
-
5
-
6
-
7
-
8
-
9
-
10
-
11
-
12
-
13
-
14
-
15
-
16
-
 17
17 -
 18
18 -
 19
19 -
 20
20 -
 21
21 -
 22
22 -
 23
23 -
 24
24 -
 25
25 -
 26
26 -
 27
27 -
28
-
29
-
30
-
31
-
32
-
33
-
34
-
35
-
36
-
37
-
38
-
39
-
40
-
41
-
42
-
43
-
44
-
45
-
46
-
47
-
48
-
49
-
50
-
51
-
52
-
53
-
54
-
55
-
56
-
57
-
58
-
59
-
60
-
61
-
62
-
63
-
64
-
65
-
66
-
67
-
68
-
69
-
70
-
71
-
72
-
73
-
74
-
75
-
76
-
77
-
78
-
79
-
80
-
81
-
82
-
83
-
84
-
85
-
86
-
87
-
88
-
89
-
90
-
91
-
92
 |
 |
