Thermador PRG366EG User Manual - Page 27
Tips For Bake, Large Main Oven, Secondary Oven Pg48 Models
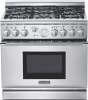 |
View all Thermador PRG366EG manuals
Add to My Manuals
Save this manual to your list of manuals |
Page 27 highlights
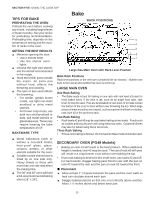
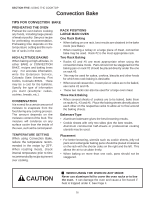
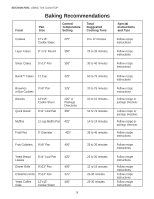
SECTION FIVE: USING THE COOKTOP TIPS FOR BAKE PREHEATING THE OVEN Preheat the oven before cooking any foods, including large pieces of meat or poultry. See your recipe for preheating recommendation. Preheating time depends on the temperature setting and the number of racks in the oven. GETTING THE BEST RESULTS ▲ Minimize opening the door: • Use a minute timer. • Use the interior oven lights. ▲ Choose the right size utensil; use the utensil recommended in the recipe. ▲ Store the broiler pans outside the ovens. An extra pan without food, affects the browning and cooking. ▲ The type of pan used affects the browning: • For tender, golden brown crusts, use light non-stick/ anodized or shiny metal utensils. • For brown crisp crusts, use dark non-stick/anodized or dark, dull metal utensils or glass bakeware. These may require lowering the bake temperature 25½F. BAKEWARE TYPE Bake RACK POSITIONS 5 4 3 2 1 Large Gas Main Oven with Rack Level Position Bake Rack Positions Rack level positions in the oven are numbered like an elevator. Number one level is the lowest and number five level is at the top. LARGE MAIN OVEN One Rack Baking • The Bake mode is best for baking on one rack with rack level #3 used for most baked items. If the item is tall, such as an angel food cake, rack level #2 may be used. Pies are best baked on rack level #2 to make certain the bottom of the crust is done without over browning the top. When large pieces of meat or poultry are roasted , such as a prime rib of beef or a turkey, rack level #2 is the preferred rack. Two Rack Baking • Rack levels #2 and #5 may be used when baking on two levels. Foods such as cookies and biscuits work well using these two racks. Casserole dishes may also be baked using these two levels. Three Rack Baking • If three-rack baking is desired, the Convection Bake mode should be used. ▲ Metal bakeware (with or without a non-stick finish), heat-proof glass, glassceramic, pottery, or other utensils suitable for the oven. ▲ Suitable cookie sheets have a small lip on one side only. Heavy sheets or those with more than one side may affect the baking time. ▲ The 36" and 48" oven will hold a full-sized commercial baking sheet (18" x 26"). SECONDARY OVEN (PG48 Models) • Baking on rack #3 will result in the best product. When additional height is needed, rack #2 may be used. The use of rack #2 with pies will result in a crisp bottom crust without over baking the top. • If two rack baking is desired in this small oven, use racks #2 and #5. For best results, stagger baking pans front to rear with the pan on rack #2 toward the rear and the pan on rack #5 toward the front. ■ Placement ▲ Allow at least 1" of space between the pans and the oven walls so heat can circulate around each pan. ▲ Stagger baking utensils so that one is not directly above another. Allow 1-1/2 inches above and below each pan. 25
-
 1
1 -
2
-
3
-
4
-
5
-
6
-
7
-
8
-
9
-
10
-
11
-
12
-
13
-
14
-
15
-
16
-
17
-
18
-
19
-
20
-
21
-
 22
22 -
 23
23 -
 24
24 -
 25
25 -
 26
26 -
 27
27 -
 28
28 -
 29
29 -
 30
30 -
 31
31 -
 32
32 -
33
-
34
-
35
-
36
-
37
-
38
-
39
-
40
-
41
-
42
-
43
-
44
-
45
-
46
-
47
-
48
-
49
-
50
-
51
-
52
-
53
-
54
-
55
-
56
-
57
-
58
-
59
-
60
-
61
-
62
-
63
-
64
-
65
-
66
-
67
-
68
-
69
-
70
-
71
-
72
-
73
-
74
-
75
-
76
-
77
-
78
-
79
-
80
-
81
-
82
-
83
-
84
-
85
-
86
-
87
-
88
-
89
-
90
-
91
-
92
 |
 |
