Toshiba Satellite 5205-S505 User Manual - Page 96
Inserting and removing diskettes, Caring for diskettes, Start, My Computer, 1/2 Floppy
 |
View all Toshiba Satellite 5205-S505 manuals
Add to My Manuals
Save this manual to your list of manuals |
Page 96 highlights
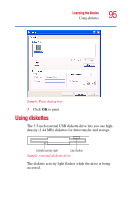
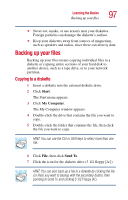
96 Learning the Basics Using diskettes Inserting and removing diskettes 1 Hold the diskette so that the arrow on its upper surface points toward the drive. 2 Push the diskette gently into the drive slot. When the diskette is in place, the eject button pops out. To release a diskette from the external drive slot, push the eject button. CAUTION: Never press the eject button or turn off the computer while the light is glowing. Doing so could destroy data and damage the diskette or the drive. To access your diskette contents: 1 Click Start, then click My Computer. 2 Double-click the 3 1/2 Floppy (A:) drive. The diskette contents appear. Caring for diskettes ❖ Store your diskettes properly to protect them and keep them clean. ❖ If a diskette is dirty, clean it with a soft cloth moistened in water. Do not use cleaning fluids. ❖ Never slide back the protective metal cover. ❖ Never touch the magnetic surface of a diskette. Fingerprints can prevent the drive from reading the data stored on a diskette. ❖ Never twist or bend a diskette. ❖ Keep diskettes at room temperature and avoid exposing them to direct sunlight. Otherwise data may be lost. ❖ Never place heavy objects on your diskettes.
-
 1
1 -
2
-
3
-
4
-
5
-
6
-
7
-
8
-
9
-
10
-
11
-
12
-
13
-
14
-
15
-
16
-
17
-
18
-
19
-
20
-
21
-
22
-
23
-
24
-
25
-
26
-
27
-
28
-
29
-
30
-
31
-
32
-
33
-
34
-
35
-
36
-
37
-
38
-
39
-
40
-
41
-
42
-
43
-
44
-
45
-
46
-
47
-
48
-
49
-
50
-
51
-
52
-
53
-
54
-
55
-
56
-
57
-
58
-
59
-
60
-
61
-
62
-
63
-
64
-
65
-
66
-
67
-
68
-
69
-
70
-
71
-
72
-
73
-
74
-
75
-
76
-
77
-
78
-
79
-
80
-
81
-
82
-
83
-
84
-
85
-
86
-
87
-
88
-
89
-
90
-
 91
91 -
 92
92 -
 93
93 -
 94
94 -
 95
95 -
 96
96 -
 97
97 -
 98
98 -
 99
99 -
 100
100 -
 101
101 -
102
-
103
-
104
-
105
-
106
-
107
-
108
-
109
-
110
-
111
-
112
-
113
-
114
-
115
-
116
-
117
-
118
-
119
-
120
-
121
-
122
-
123
-
124
-
125
-
126
-
127
-
128
-
129
-
130
-
131
-
132
-
133
-
134
-
135
-
136
-
137
-
138
-
139
-
140
-
141
-
142
-
143
-
144
-
145
-
146
-
147
-
148
-
149
-
150
-
151
-
152
-
153
-
154
-
155
-
156
-
157
-
158
-
159
-
160
-
161
-
162
-
163
-
164
-
165
-
166
-
167
-
168
-
169
-
170
-
171
-
172
-
173
-
174
-
175
-
176
-
177
-
178
-
179
-
180
-
181
-
182
-
183
-
184
-
185
-
186
-
187
-
188
-
189
-
190
-
191
-
192
-
193
-
194
-
195
-
196
-
197
-
198
-
199
-
200
-
201
-
202
-
203
-
204
-
205
-
206
-
207
-
208
-
209
-
210
-
211
-
212
-
213
-
214
-
215
-
216
-
217
-
218
-
219
-
220
-
221
-
222
-
223
-
224
-
225
-
226
-
227
-
228
-
229
-
230
-
231
-
232
-
233
-
234
-
235
-
236
-
237
-
238
-
239
-
240
-
241
-
242
-
243
-
244
-
245
-
246
-
247
-
248
-
249
-
250
-
251
-
252
-
253
-
254
-
255
-
256
-
257
-
258
-
259
-
260
-
261
-
262
-
263
-
264
-
265
-
266
-
267
-
268
-
269
-
270
-
271
-
272
-
273
-
274
-
275
-
276
-
277
-
278
-
279
-
280
-
281
-
282
-
283
-
284
-
285
-
286
-
287
-
288
-
289
-
290
-
291
-
292
-
293
-
294
-
295
-
296
-
297
-
298
-
299
-
300
-
301
-
302
-
303
-
304
-
305
-
306
-
307
-
308
-
309
-
310
-
311
-
312
 |
 |
