Toshiba TLP-MT7 Owner's Manual - English - Page 26
Projection on the screen continued - lcd projector
 |
UPC - 022265950821
View all Toshiba TLP-MT7 manuals
Add to My Manuals
Save this manual to your list of manuals |
Page 26 highlights
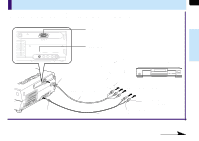
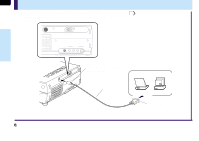
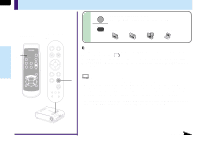
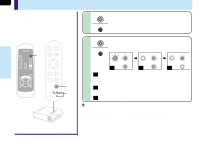
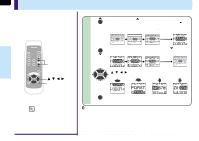
26 Projection on the screen (continued) Operations Control panel Remote control (Main unit side) 3 INPUT ON / STANDBY KEYSTONE AUTO SET FREEZE MUTE PIP CALL RESIZE MENU VOL/ADJ ENTER CT-90072 EXIT AUTO KEYSTONE AUTO SET VOL/ADJ. ENTER EXIT MENU INPUT ON/STANDBY TEMP LAMP ON BUSY FAN 3 3 INPUT Select the input source. Press the INPUT button repeatedly to select it. The icon of the input source selected appears. INPUT Y/PB/PR Video S-Video Computer Note The types of input sources selected when the INPUT button is pressed repeatedly can be set from the menu screen. 38 (At shipping from factory, the projector is set so that the component signal source input to the COMPONENT IN connector and the video signal source input to the VIDEO jack can be selected.) (Signal sent from the computer) • If you project an image from a computer with an LCD screen while monitoring the image on the computer, the image may not be projected properly, depending on the computer model. In this case, turn off the computer display. For details on controlling the computer display, etc., refer to the computer's manual and description on the software for the computer used. • An image on a computer is displayed enlarged or reduced, so quality of the screen becomes a bit inferior. • The projector can be also applied to DDC2B (Display Data Channel 2B). If your computer is applied to the DDC, start up your computer after turning on the projector. ENTER MENU INPUT TEMP BUSY LAMP FAN ON/STANDBY ON EXIT KEYASUTOTONE VOL/ADJ. SAEUTTO Continued
-
 1
1 -
2
-
3
-
4
-
5
-
6
-
7
-
8
-
9
-
10
-
11
-
12
-
13
-
14
-
15
-
16
-
17
-
18
-
19
-
20
-
 21
21 -
 22
22 -
 23
23 -
 24
24 -
 25
25 -
 26
26 -
 27
27 -
 28
28 -
 29
29 -
 30
30 -
 31
31 -
32
-
33
-
34
-
35
-
36
-
37
-
38
-
39
-
40
-
41
-
42
-
43
-
44
-
45
-
46
-
47
-
48
-
49
-
50
-
51
-
52
-
53
-
54
-
55
-
56
-
57
-
58
-
59
-
60
-
61
-
62
-
63
-
64
-
65
-
66
-
67
-
68
-
69
-
70
-
71
-
72
-
73
-
74
-
75
-
76
-
77
-
78
-
79
-
80
 |
 |
