Toshiba TLP-MT7 Owner's Manual - English - Page 70
Before calling service personal
 |
UPC - 022265950821
View all Toshiba TLP-MT7 manuals
Add to My Manuals
Save this manual to your list of manuals |
Page 70 highlights
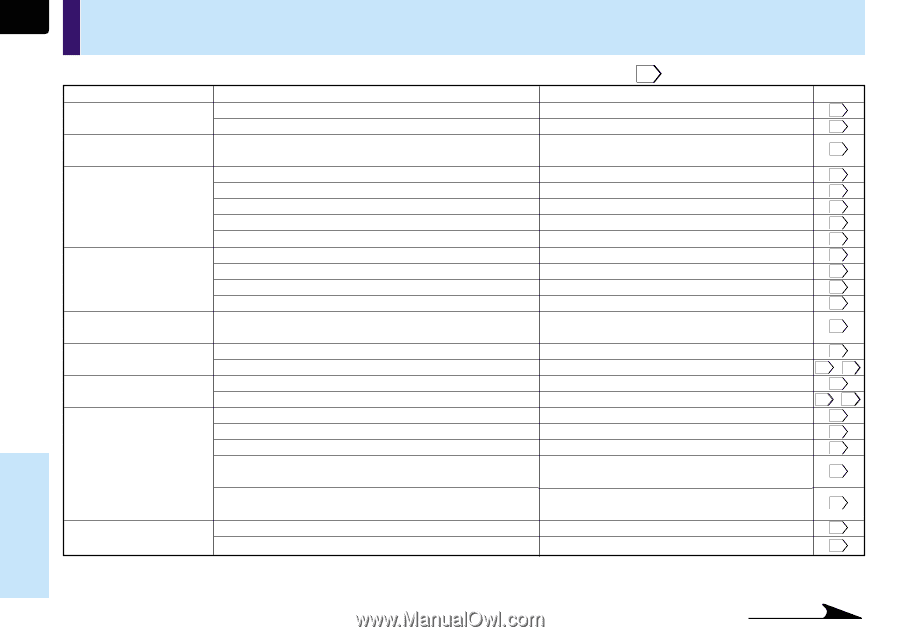
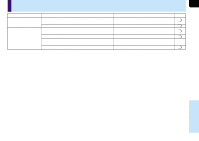
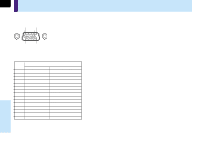
70 Before calling service personal Check the following points before asking for support service. Refer also to "Trouble indications". 64 Symptom The power does not come on. The power turns off while using the projector. No image appears. No sound is heard. Desired input source cannot be selected by the INPUT button. Computer input or Y/PB/PR input colors are not right. Computer input or Y/PB/PR input image does not appear. The image is blurred. Focusing is uneven. The picture is dim. Cause • The power cord is disconnected. • The lamp cover is not attached correctly. • The ambient temperature of the projection room is too high. • The lens cover is on. • The wrong input is selected. • The muting mode is on. • The "Brightness" adjustment is at its darkest. • The source is not correctly connected to the projector. • The wrong input is selected. • The muting mode is on. • The sound volume is at the minimum. • The source is not correctly connected to the projector. • Input is not set so that it can be selected with the INPUT button. By default, only the Component and Video input modes can be selected. • The COMPONENT IN connector's input setting is wrong. • The signal cable type is wrong. • The COMPONENT IN connector's input setting is wrong. • The signal cable type is wrong. • The lens is dirty. • The picture is out of focus. • The projection distance is not appropriate. • The projecting light is not hitting the screen squarely. • The "Brightness", "Contrast", "Sharpness" or "Phase" adjustments are not correct. • The "Brightness" or "Contrast" adjustments are not correct. • The lamp life is ending. Correction Firmly plug in the power cord. Attach the cover correctly. Lower the ambient temperature of the projection room, and turn the power on. Take off the lens cover. Select the input source correctly. Press MUTE to restore the picture. Make the "Brightness" adjustment. Connect the source correctly to the projector. Select the input source correctly. Press MUTE to restore the sound. Adjust the sound volume. Connect the source correctly to the projector. Set from the menu screen so that the source can be selected with the INPUT button. At the menu screen, set for the proper input signal type. Use a proper signal cable. At the menu screen, set for the proper input signal type. Use a proper signal cable. Clean the lens with a blower or lens cleaner, etc. Focus the picture. Adjust the distance properly. Adjust the projecting direction so that the light hits the screen squarely. Make the "Picture" adjustments. Make the "Picture" adjustments. Replace the lamp. Page 18 69 64 18 26 31 38 21 26 31 27 21 38 38 21 23 38 21 23 67 27 17 17 44 44 68 Others Continued
-
 1
1 -
2
-
3
-
4
-
5
-
6
-
7
-
8
-
9
-
10
-
11
-
12
-
13
-
14
-
15
-
16
-
17
-
18
-
19
-
20
-
21
-
22
-
23
-
24
-
25
-
26
-
27
-
28
-
29
-
30
-
31
-
32
-
33
-
34
-
35
-
36
-
37
-
38
-
39
-
40
-
41
-
42
-
43
-
44
-
45
-
46
-
47
-
48
-
49
-
50
-
51
-
52
-
53
-
54
-
55
-
56
-
57
-
58
-
59
-
60
-
61
-
62
-
63
-
64
-
 65
65 -
 66
66 -
 67
67 -
 68
68 -
 69
69 -
 70
70 -
 71
71 -
 72
72 -
 73
73 -
 74
74 -
 75
75 -
76
-
77
-
78
-
79
-
80
 |
 |