Toshiba TLP-MT7 Owner's Manual - English - Page 44
FULL MENU adjustments and settings - Picture
 |
UPC - 022265950821
View all Toshiba TLP-MT7 manuals
Add to My Manuals
Save this manual to your list of manuals |
Page 44 highlights
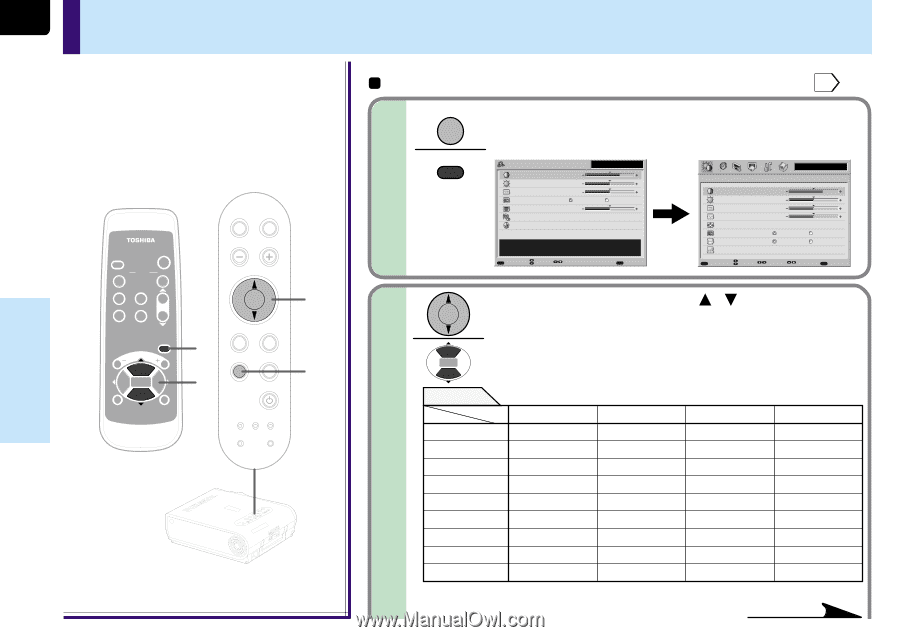
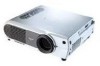
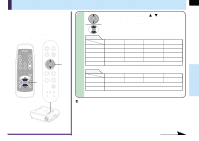
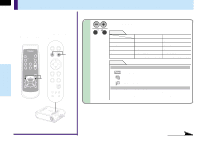
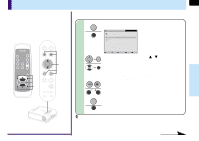
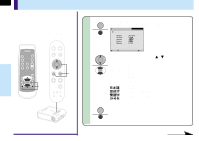
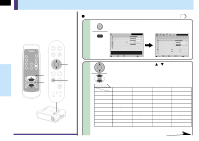
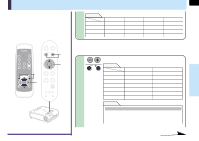
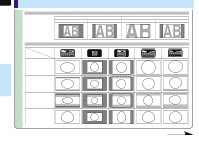
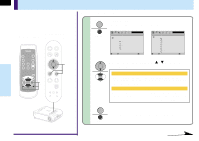
Adjustments & Settings 44 FULL MENU adjustments and settings - Picture You can adjust contrast, brightness, color level, image position, etc. Preparation 1 Project a picture on the screen as explained in the step "Projection on the screen". 25 Remote control Control panel (Main unit side) AUTO KEYSTONE AUTO SET INPUT ON / STANDBY KEYSTONE AUTO SET FREEZE MUTE PIP CALL RESIZE MENU VOL/ADJ ENTER CT-90072 EXIT VOL/ADJ. 1 2 ENTER EXIT MENU INPUT ON/STANDBY 2 1 TEMP LAMP ON BUSY FAN ENTER MENU INPUT TEMP BUSY LAMP FAN ON/STANDBY ON EXIT KEYASUTOTONE VOL/ADJ. SAEUTTO 1 MENU MENU Press MENU twice. When pressed once, the QUICK MENU screen appears. When pressed twice, the "Picture" screen of the FULL MENU appears. QUICK MENU Computer Contrast +6 Brightness 0 Phase 0 Picture mode Bright Keystone 0 Input source setting Language True color [ENTER] [ENTER] Adjust the contrast of the image. MENUFULL Item Adjust EXIT Quit Picture Contrast Brightness Phase Frequency Position Picture mode Screen size Level MENU QUICK Item Computer +6 0 0 0 Bright Full [ENTER] True color Thru [ENTER] Page Adjust EXIT Quit 2 Use the selection buttons ( / ) to select the adjustment and setting items. The types of adjustment and setting items are different depending on the type of input source currently selected. (See the table below.) Adjustments Items Inputs Contrast Brightness Color Tint Sharpness Phase Frequency Position Level Computer Yes Yes No No No Yes Yes Yes Yes *1: Adjustment is impossible at 480i mode. Y/PB/PR Yes Yes Yes Yes*1 Yes*1 No No No Yes Yes: Adjustable No: Not displayed Video S-Video Yes Yes Yes Yes Yes Yes Yes*2 Yes*2 Yes Yes No No No No No No Yes Yes *2: Adjustment is impossible at PAL/SECAM. Continued
-
 1
1 -
2
-
3
-
4
-
5
-
6
-
7
-
8
-
9
-
10
-
11
-
12
-
13
-
14
-
15
-
16
-
17
-
18
-
19
-
20
-
21
-
22
-
23
-
24
-
25
-
26
-
27
-
28
-
29
-
30
-
31
-
32
-
33
-
34
-
35
-
36
-
37
-
38
-
 39
39 -
 40
40 -
 41
41 -
 42
42 -
 43
43 -
 44
44 -
 45
45 -
 46
46 -
 47
47 -
 48
48 -
 49
49 -
50
-
51
-
52
-
53
-
54
-
55
-
56
-
57
-
58
-
59
-
60
-
61
-
62
-
63
-
64
-
65
-
66
-
67
-
68
-
69
-
70
-
71
-
72
-
73
-
74
-
75
-
76
-
77
-
78
-
79
-
80
 |
 |