Weider Pro 9020 English Manual - Page 23
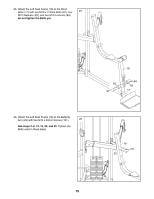
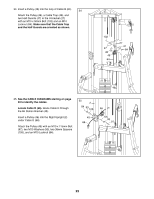
Insert a Pulley 46 into the Right Upright 2
 |
View all Weider Pro 9020 manuals
Add to My Manuals
Save this manual to your list of manuals |
Page 23 highlights
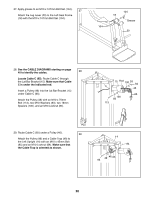
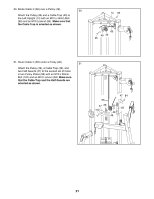
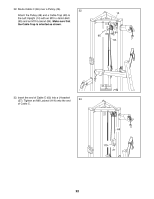
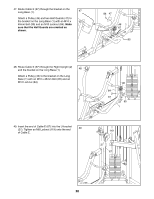
34. Insert a Pulley (46) into the loop of Cable B (64). 34 Attach the Pulley (46), a Cable Trap (49), and two Half Guards (47) to the U-bracket (27) with an M10 x 50mm Bolt (102) and an M10 Locknut (84). Make sure that the Cable Trap and the Half Guards are oriented as shown. 102 47 49 46 64 27 47 84 35. See the CABLE DIAGRAMS starting on page 40 to identify the cables. Locate Cable D (66). Route Cable D through the Ab Station Bracket (45). Insert a Pulley (46) into the Right Upright (2) under Cable D (66). Attach the Pulley (46) with an M10 x 115mm Bolt (97), two M10 Washers (93), two 38mm Spacers (105), and an M10 Locknut (84). 35 2 84 93 105 45 66 46 105 93 97 23
-
 1
1 -
2
-
3
-
4
-
5
-
6
-
7
-
8
-
9
-
10
-
11
-
12
-
13
-
14
-
15
-
16
-
17
-
 18
18 -
 19
19 -
 20
20 -
 21
21 -
 22
22 -
 23
23 -
 24
24 -
 25
25 -
 26
26 -
 27
27 -
 28
28 -
29
-
30
-
31
-
32
-
33
-
34
-
35
-
36
-
37
-
38
-
39
-
40
-
41
-
42
-
43
-
44
-
45
-
46
-
47
-
48
-
49
-
50
-
51
-
52
 |
 |

23
34. Insert a Pulley (46) into the loop of Cable B (64).
Attach the Pulley (46), a Cable Trap (49), and
two Half Guards (47) to the U-bracket (27)
with an M10 x 50mm Bolt (102) and an M10
Locknut (84).
Make sure that the Cable Trap
and the Half Guards are oriented as shown.
35.
See the CABLE DIAGRAMS starting on page
40 to identify the cables.
Locate Cable D (66).
Route Cable D through
the Ab Station Bracket (45).
Insert a Pulley (46) into the Right Upright (2)
under Cable D (66).
Attach the Pulley (46) with an M10 x 115mm Bolt
(97), two M10 Washers (93), two 38mm Spacers
(105), and an M10 Locknut (84).
34
35
47
47
84
27
49
46
64
46
105
84
93
105
45
2
97
93
66
102