Weider Pro 9020 English Manual - Page 26
Attach Cable E 67 with an M10 x 68mm Bolt
 |
View all Weider Pro 9020 manuals
Add to My Manuals
Save this manual to your list of manuals |
Page 26 highlights
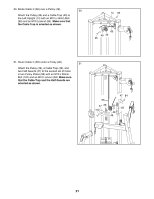
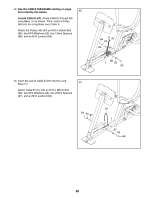
42. See the CABLE DIAGRAMS starting on page 40 to identify the cables. 42 Locate Cable E (67). Route Cable E through the Long Base (1) as shown. Then, insert a Pulley (46) into the Long Base over Cable E. Attach the Pulley (46) with an M10 x 65mm Bolt (85), two M10 Washers (93), two 13mm Spacers (86), and an M10 Locknut (84). 84 67 93 86 46 86 1 93 85 43. Insert the end of Cable E (67) into the Long Base (1). 43 Attach Cable E (67) with an M10 x 68mm Bolt (98), two M10 Washers (93), two 24mm Spacers (87), and an M10 Locknut (84). 84 93 87 67 1 87 93 98 26
-
 1
1 -
2
-
3
-
4
-
5
-
6
-
7
-
8
-
9
-
10
-
11
-
12
-
13
-
14
-
15
-
16
-
17
-
18
-
19
-
20
-
 21
21 -
 22
22 -
 23
23 -
 24
24 -
 25
25 -
 26
26 -
 27
27 -
 28
28 -
 29
29 -
 30
30 -
 31
31 -
32
-
33
-
34
-
35
-
36
-
37
-
38
-
39
-
40
-
41
-
42
-
43
-
44
-
45
-
46
-
47
-
48
-
49
-
50
-
51
-
52
 |
 |

26
42
84
93
86
1
86
93
85
46
67
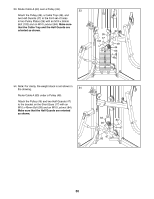
42.
See the CABLE DIAGRAMS starting on page
40 to identify the cables.
Locate Cable E (67).
Route Cable E through the
Long Base (1) as shown. Then, insert a Pulley
(46) into the Long Base over Cable E.
Attach the Pulley (46) with an M10 x 65mm Bolt
(85), two M10 Washers (93), two 13mm Spacers
(86), and an M10 Locknut (84).
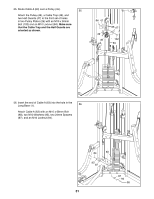
43
84
93
87
87
93
98
67
1
43. Insert the end of Cable E (67) into the Long
Base (1).
Attach Cable E (67) with an M10 x 68mm Bolt
(98), two M10 Washers (93), two 24mm Spacers
(87), and an M10 Locknut (84).