Xerox 2135N Quick Reference Guide - Page 52
The media skews passing through the paper path, The paper tray indicates it is empty when it is
 |
UPC - 042215474689
View all Xerox 2135N manuals
Add to My Manuals
Save this manual to your list of manuals |
Page 52 highlights
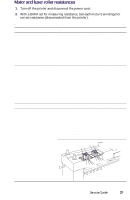
The media skews passing through the paper path 1. Make sure that the media is properly installed in the tray. 2. Does the pick-up roller pick up evenly? Is it clean? Clean it with a clean, dry, lint-free cloth if debris is visible. 3. Is the paper tray damaged or obstructed? 4. Are the tray's side paper guides snugly adjusted against the stack of media? The guides should be neither too loose nor too tight. 5. The problem occur when printing from a different tray? 6. Is there an obstacle blocking the paper path? 7. Is the media excessively curled? 8. Is the customer using an appropriate type of media - a type the printer can handle? 9. Ensure the corners or the paper are under the tabs in the corners of the tray. 10. Replace the paper pick rollers. The paper tray indicates it is empty when it is not The procedure for troubleshooting this problem applies to the lower tray assembly as well. 1. Does the paper empty flag properly interrupt the paper empty sensor? Remove the paper tray and actuate the paper-empty flag located to the left of the pick rollers. 2. Test the sensor using the service tests described in "Switch scan test" on page 63. 3. Does the tray lift motor raise the loaded paper up to the sensor flag when the tray is installed? Remove most of the paper from the tray, reinsert the tray in the printer and then observe the tray paper level indicator on the front of the tray. The indicator should move from a level full indication (tray lift in lowest position) to a near-empty indication (tray lift in a higher position). Ensure the tray lift mechanism in the tray moves freely. If you do not hear the tray lift motor operate, test the motor with the motor test in "Motor and clutch tests" on page 69. Replace the tray lift motor, if necessary. If the motor runs but the paper is not raised, replace the main feeder assembly. 4. Replace the engine controller board. Service Guide 39
-
 1
1 -
2
-
3
-
4
-
5
-
6
-
7
-
8
-
9
-
10
-
11
-
12
-
13
-
14
-
15
-
16
-
17
-
18
-
19
-
20
-
21
-
22
-
23
-
24
-
25
-
26
-
27
-
28
-
29
-
30
-
31
-
32
-
33
-
34
-
35
-
36
-
37
-
38
-
39
-
40
-
41
-
42
-
43
-
44
-
45
-
46
-
 47
47 -
 48
48 -
 49
49 -
 50
50 -
 51
51 -
 52
52 -
 53
53 -
 54
54 -
 55
55 -
 56
56 -
 57
57 -
58
-
59
-
60
-
61
-
62
-
63
-
64
-
65
-
66
-
67
-
68
-
69
-
70
-
71
-
72
-
73
-
74
-
75
-
76
-
77
-
78
-
79
-
80
-
81
-
82
-
83
-
84
-
85
-
86
-
87
-
88
-
89
-
90
-
91
-
92
-
93
-
94
-
95
-
96
-
97
-
98
-
99
-
100
-
101
-
102
-
103
-
104
-
105
-
106
-
107
-
108
-
109
-
110
-
111
-
112
-
113
-
114
-
115
-
116
-
117
-
118
-
119
-
120
-
121
-
122
-
123
-
124
-
125
-
126
-
127
-
128
-
129
-
130
-
131
-
132
-
133
-
134
-
135
-
136
-
137
-
138
-
139
-
140
-
141
-
142
-
143
-
144
-
145
-
146
-
147
-
148
-
149
-
150
-
151
-
152
-
153
-
154
-
155
-
156
-
157
-
158
-
159
-
160
-
161
-
162
-
163
-
164
-
165
-
166
-
167
-
168
-
169
-
170
-
171
-
172
-
173
-
174
-
175
-
176
-
177
-
178
-
179
-
180
-
181
-
182
-
183
-
184
-
185
-
186
-
187
-
188
-
189
-
190
-
191
-
192
-
193
-
194
-
195
-
196
-
197
-
198
-
199
 |
 |
