Xerox 4250 User Guide - Page 48
Enter the Quantity, Clear All, Feature, Description
 |
UPC - 095205751413
View all Xerox 4250 manuals
Add to My Manuals
Save this manual to your list of manuals |
Page 48 highlights
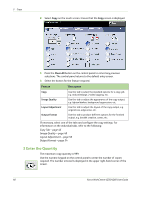
3 Copy 2. Select Copy on the touch screen. Ensure that the Copy screen is displayed. 3. Press the Clear All button on the control panel to cancel any previous selections. The control panel returns to the default entry screen. 4. Select the button for the feature required. Feature Description Copy Use this tab to select the standard options for a copy job, e.g. reduce/enlarge, 2 sided copying, etc. Image Quality Use this tab to adjust the appearance of the copy output, e.g. lighten/darken, background suppression, etc. Layout Adjustment Use this tab to adjust the layout of the copy output, e.g. original size, edge erase, etc. Output Format Use this tab to produce different options for the finished output, e.g. booklet creation, covers, etc. If necessary, select one of the tabs and configure the copy settings. For information on the individual tabs, refer to the following: Copy Tab - page 45 Image Quality - page 48 Layout Adjustment - page 50 Output Format - page 54 3 Enter the Quantity The maximum copy quantity is 999. Use the numeric keypad on the control panel to enter the number of copies required. The number entered is displayed in the upper right-hand corner of the screen. 40 Xerox WorkCentre 4250/4260 User Guide
-
 1
1 -
2
-
3
-
4
-
5
-
6
-
7
-
8
-
9
-
10
-
11
-
12
-
13
-
14
-
15
-
16
-
17
-
18
-
19
-
20
-
21
-
22
-
23
-
24
-
25
-
26
-
27
-
28
-
29
-
30
-
31
-
32
-
33
-
34
-
35
-
36
-
37
-
38
-
39
-
40
-
41
-
42
-
 43
43 -
 44
44 -
 45
45 -
 46
46 -
 47
47 -
 48
48 -
 49
49 -
 50
50 -
 51
51 -
 52
52 -
 53
53 -
54
-
55
-
56
-
57
-
58
-
59
-
60
-
61
-
62
-
63
-
64
-
65
-
66
-
67
-
68
-
69
-
70
-
71
-
72
-
73
-
74
-
75
-
76
-
77
-
78
-
79
-
80
-
81
-
82
-
83
-
84
-
85
-
86
-
87
-
88
-
89
-
90
-
91
-
92
-
93
-
94
-
95
-
96
-
97
-
98
-
99
-
100
-
101
-
102
-
103
-
104
-
105
-
106
-
107
-
108
-
109
-
110
-
111
-
112
-
113
-
114
-
115
-
116
-
117
-
118
-
119
-
120
-
121
-
122
-
123
-
124
-
125
-
126
-
127
-
128
-
129
-
130
-
131
-
132
-
133
-
134
-
135
-
136
-
137
-
138
-
139
-
140
-
141
-
142
-
143
-
144
-
145
-
146
-
147
-
148
-
149
-
150
-
151
-
152
-
153
-
154
-
155
-
156
-
157
-
158
-
159
-
160
-
161
-
162
-
163
-
164
-
165
-
166
-
167
-
168
-
169
-
170
-
171
-
172
-
173
-
174
-
175
-
176
-
177
-
178
-
179
-
180
-
181
-
182
-
183
-
184
-
185
-
186
-
187
-
188
-
189
-
190
-
191
-
192
-
193
-
194
-
195
-
196
-
197
-
198
-
199
-
200
-
201
-
202
-
203
-
204
-
205
-
206
-
207
-
208
-
209
-
210
-
211
-
212
-
213
-
214
-
215
-
216
-
217
-
218
-
219
-
220
-
221
-
222
-
223
-
224
-
225
-
226
-
227
-
228
-
229
-
230
 |
 |
