ZyXEL MWR102 User Guide - Page 16
The Rear Panel - setup
 |
View all ZyXEL MWR102 manuals
Add to My Manuals
Save this manual to your list of manuals |
Page 16 highlights
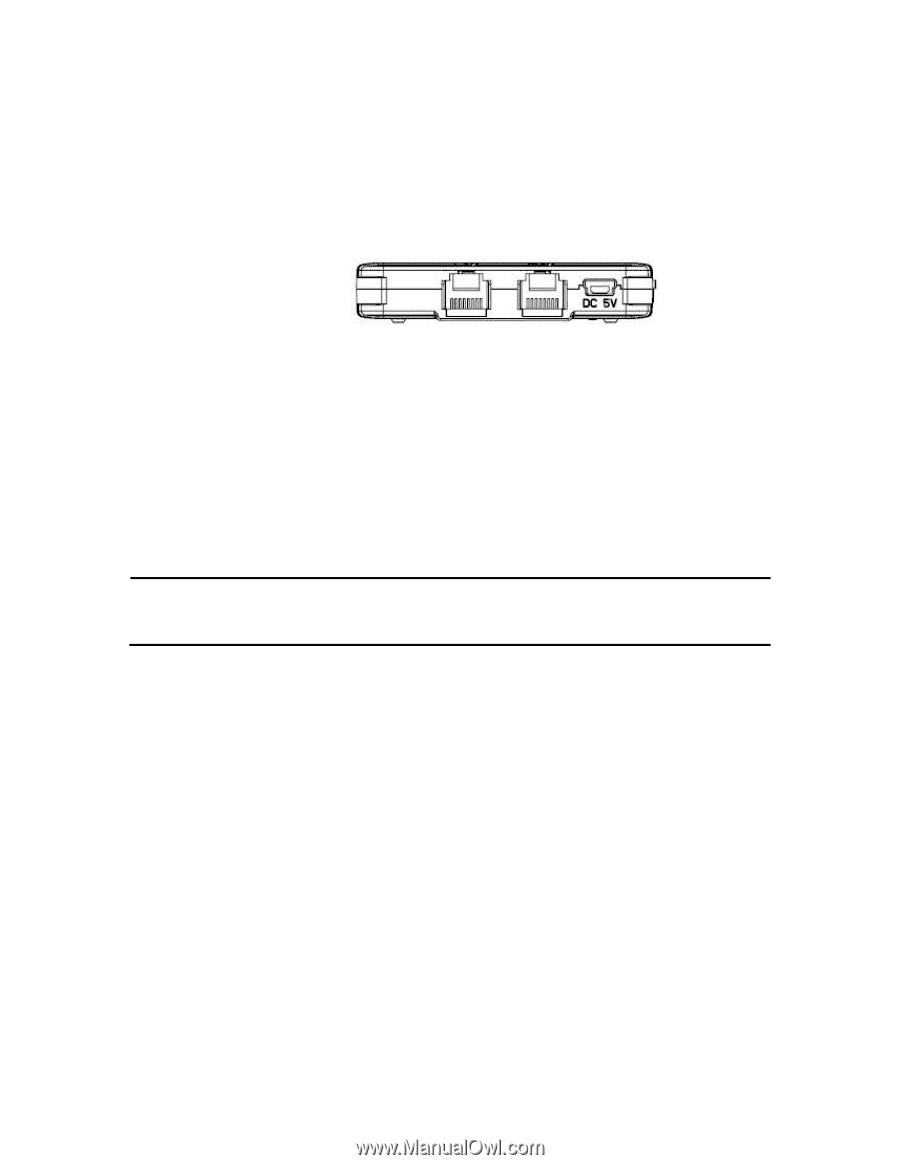
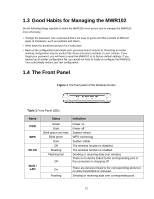
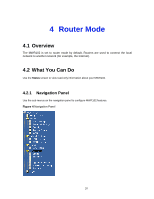
1.5 The Rear Panel Figure 2 The rear panel of the Wireless Router. LAN: Through this port, you can connect the router to your PCs and the other Ethernet network devices. WAN: This WAN port is where you will connect the cable/DSL Modem, or Ethernet. DC IN: Plug the end of the cable firmly into the rear panel of the router, and plug the other end into a USB outlet to power the system. WPS/Reset Button: Located on the underside of the device. Click this button to start PBC configuration method for easy WPS setup.Hold the reset button for 5 seconds or more to reset the system to factory defaults. The system will then reboot, and approximately 60 seconds later will be ready for further use. The reboot process cannot be interrupted by powering off the device, or the unit will fail. Before performing the reset process, ensure the system will be able to finish rebooting! Warning: Incomplete factory setting recovery procedure will cause the Wireless Router to malfunction! If you are in this situation, do not try to repair it by yourself. Consult your local distributor for help! 16
-
 1
1 -
2
-
3
-
4
-
5
-
6
-
7
-
8
-
9
-
10
-
 11
11 -
 12
12 -
 13
13 -
 14
14 -
 15
15 -
 16
16 -
 17
17 -
 18
18 -
 19
19 -
 20
20 -
 21
21 -
22
-
23
-
24
-
25
-
26
-
27
-
28
-
29
-
30
-
31
-
32
-
33
-
34
-
35
-
36
-
37
-
38
-
39
-
40
-
41
-
42
-
43
-
44
-
45
-
46
-
47
-
48
-
49
-
50
-
51
-
52
-
53
-
54
-
55
-
56
-
57
-
58
-
59
-
60
-
61
-
62
-
63
-
64
-
65
-
66
-
67
-
68
-
69
-
70
-
71
-
72
-
73
-
74
-
75
-
76
-
77
-
78
-
79
-
80
-
81
-
82
-
83
-
84
-
85
-
86
-
87
-
88
-
89
-
90
-
91
-
92
-
93
-
94
-
95
-
96
-
97
-
98
-
99
-
100
-
101
-
102
-
103
-
104
-
105
-
106
-
107
-
108
-
109
-
110
-
111
-
112
-
113
-
114
-
115
-
116
-
117
-
118
-
119
-
120
-
121
-
122
-
123
-
124
-
125
-
126
-
127
-
128
-
129
-
130
-
131
-
132
-
133
-
134
-
135
-
136
-
137
-
138
-
139
-
140
-
141
-
142
-
143
-
144
-
145
-
146
-
147
-
148
-
149
-
150
-
151
-
152
-
153
-
154
-
155
-
156
-
157
-
158
-
159
-
160
-
161
-
162
-
163
-
164
-
165
-
166
-
167
-
168
-
169
-
170
-
171
-
172
-
173
-
174
-
175
-
176
-
177
-
178
-
179
-
180
-
181
-
182
-
183
 |
 |