Apple M9690LL User Guide - Page 58
Installing Additional Memory, Removing the Battery
 |
UPC - 718908816042
View all Apple M9690LL manuals
Add to My Manuals
Save this manual to your list of manuals |
Page 58 highlights
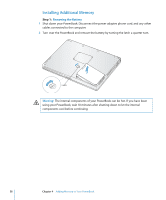
Installing Additional Memory Step 1: Removing the Battery 1 Shut down your PowerBook. Disconnect the power adapter, phone cord, and any other cables connected to the computer. 2 Turn over the PowerBook and remove the battery by turning the latch a quarter turn. Latch ª Warning: The internal components of your PowerBook can be hot. If you have been using your PowerBook, wait 10 minutes after shutting down to let the internal components cool before continuing. 58 Chapter 4 Adding Memory to Your PowerBook
-
 1
1 -
2
-
3
-
4
-
5
-
6
-
7
-
8
-
9
-
10
-
11
-
12
-
13
-
14
-
15
-
16
-
17
-
18
-
19
-
20
-
21
-
22
-
23
-
24
-
25
-
26
-
27
-
28
-
29
-
30
-
31
-
32
-
33
-
34
-
35
-
36
-
37
-
38
-
39
-
40
-
41
-
42
-
43
-
44
-
45
-
46
-
47
-
48
-
49
-
50
-
51
-
52
-
 53
53 -
 54
54 -
 55
55 -
 56
56 -
 57
57 -
 58
58 -
 59
59 -
 60
60 -
 61
61 -
 62
62 -
 63
63 -
64
-
65
-
66
-
67
-
68
-
69
-
70
-
71
-
72
-
73
-
74
-
75
-
76
-
77
-
78
-
79
-
80
-
81
-
82
-
83
-
84
-
85
-
86
-
87
-
88
-
89
-
90
-
91
-
92
-
93
-
94
-
95
-
96
-
97
-
98
-
99
-
100
-
101
-
102
-
103
-
104
-
105
-
106
-
107
-
108
-
109
-
110
-
111
-
112
 |
 |

58
Chapter 4
Adding Memory to Your PowerBook
Installing Additional Memory
Step 1:
Removing the Battery
1
Shut down your PowerBook. Disconnect the power adapter, phone cord, and any other
cables connected to the computer.
2
Turn over the PowerBook and remove the battery by turning the latch a quarter turn.
ª
Warning:
The internal components of your PowerBook can be hot. If you have been
using your PowerBook, wait 10 minutes after shutting down to let the internal
components cool before continuing.
Latch