Apple M9690LL User Guide - Page 59
Installing Memory, Step 2
 |
UPC - 718908816042
View all Apple M9690LL manuals
Add to My Manuals
Save this manual to your list of manuals |
Page 59 highlights
Step 2: Installing Memory 1 Using a Phillips size 00 screwdriver, unscrew the memory door and remove it from the bottom of your computer. 2 Touch a metal surface inside the computer to discharge any static electricity from your body. 3 If you already have a memory card installed in the slot, remove it. Spread the tabs in the slot away from the notches in the memory card. The card should pop up slightly. Lift the memory card to a 30-degree angle and then gently slide the card out of the memory slot. Chapter 4 Adding Memory to Your PowerBook 59
-
 1
1 -
2
-
3
-
4
-
5
-
6
-
7
-
8
-
9
-
10
-
11
-
12
-
13
-
14
-
15
-
16
-
17
-
18
-
19
-
20
-
21
-
22
-
23
-
24
-
25
-
26
-
27
-
28
-
29
-
30
-
31
-
32
-
33
-
34
-
35
-
36
-
37
-
38
-
39
-
40
-
41
-
42
-
43
-
44
-
45
-
46
-
47
-
48
-
49
-
50
-
51
-
52
-
53
-
 54
54 -
 55
55 -
 56
56 -
 57
57 -
 58
58 -
 59
59 -
 60
60 -
 61
61 -
 62
62 -
 63
63 -
 64
64 -
65
-
66
-
67
-
68
-
69
-
70
-
71
-
72
-
73
-
74
-
75
-
76
-
77
-
78
-
79
-
80
-
81
-
82
-
83
-
84
-
85
-
86
-
87
-
88
-
89
-
90
-
91
-
92
-
93
-
94
-
95
-
96
-
97
-
98
-
99
-
100
-
101
-
102
-
103
-
104
-
105
-
106
-
107
-
108
-
109
-
110
-
111
-
112
 |
 |

Chapter 4
Adding Memory to Your PowerBook
59
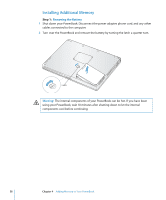
Step 2:
Installing Memory
1
Using a Phillips size 00 screwdriver, unscrew the memory door and remove it from the
bottom of your computer.
2
Touch a metal surface inside the computer to discharge any static electricity from
your body.
3
If you already have a memory card installed in the slot, remove it. Spread the tabs in
the slot away from the notches in the memory card. The card should pop up slightly.
Lift the memory card to a 30-degree angle and then gently slide the card out of the
memory slot.