Asus P5AD2-E Premium User Guide - Page 137
Silicon Image RAID configurations
 |
View all Asus P5AD2-E Premium manuals
Add to My Manuals
Save this manual to your list of manuals |
Page 137 highlights
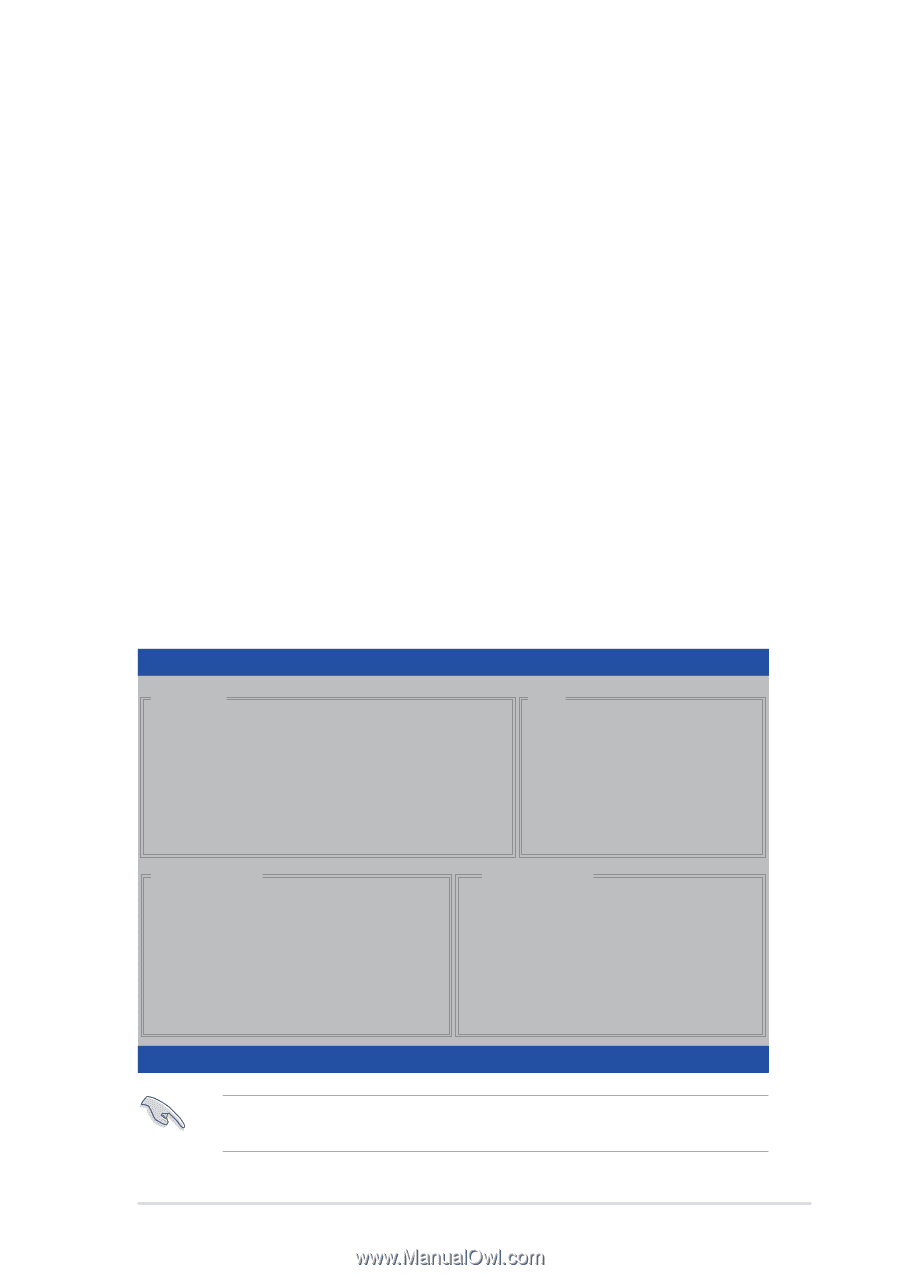
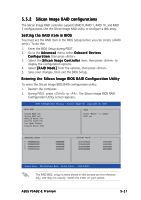
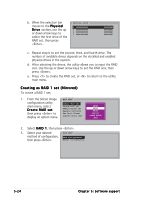
5.5.2 Silicon Image RAID configurations The Silicon Image RAID controller supports RAID 0, RAID 1, RAID 10, and RAID 5 configurations. Use the Silicon Image RAID utility to configure a disk array. Setting the RAID item in BIOS You must set the RAID item in the BIOS Setup before you can create a RAID set(s). To do this: 1. Enter the BIOS Setup during POST. 2. Go to the A d v a n c e d menu, select O n b o a r d D e v i c e s C o n f i g u r a t i o n, then press . 3. Select the S i l i c o n I m a g e C o n t r o l l e r item, then press to display the configuration options. 4. Select [ R A I D M o d e ] from the options, then press . 5. Save your changes, then exit the BIOS Setup. Entering the Silicon Image BIOS RAID Configuration Utility To enter the Silicon Image BIOS RAID configuration utility: 1. Restart the computer. 2. During POST, press or . The Silicon Image BIOS RAID Configuration Utility screen appears. RAID Configuration Utility - Silicon Image Inc. Copyright (C) 2004 MAIN MENU Create RAID set Delete RAID set Rebuild Raid1 set Resolve Conflicts Low Level Format Logical Drive Info HELP Press "Enter" to create RAID set PHYSICAL DRIVE 0 XXXXXXXXXXX 1 XXXXXXXXXXX 2 XXXXXXXXXXX 3 XXXXXXXXXXX XXXXXXMB XXXXXXMB XXXXXXMB XXXXXXMB LOGICAL DRIVE STXXXXXXXXX STXXXXXXXXX STXXXXXXXXX STXXXXXXXXX XXXXXXMB XXXXXXMB XXXXXXMB XXXXXXMB ↑↓:Select Menu ESC:Previous Menu Enter:Select Ctrl-E:Exit The RAID BIOS setup screens shown in this section are for reference only, and may not exactly match the items on your screen. ASUS P5AD2-E Premium 5-21
-
 1
1 -
2
-
3
-
4
-
5
-
6
-
7
-
8
-
9
-
10
-
11
-
12
-
13
-
14
-
15
-
16
-
17
-
18
-
19
-
20
-
21
-
22
-
23
-
24
-
25
-
26
-
27
-
28
-
29
-
30
-
31
-
32
-
33
-
34
-
35
-
36
-
37
-
38
-
39
-
40
-
41
-
42
-
43
-
44
-
45
-
46
-
47
-
48
-
49
-
50
-
51
-
52
-
53
-
54
-
55
-
56
-
57
-
58
-
59
-
60
-
61
-
62
-
63
-
64
-
65
-
66
-
67
-
68
-
69
-
70
-
71
-
72
-
73
-
74
-
75
-
76
-
77
-
78
-
79
-
80
-
81
-
82
-
83
-
84
-
85
-
86
-
87
-
88
-
89
-
90
-
91
-
92
-
93
-
94
-
95
-
96
-
97
-
98
-
99
-
100
-
101
-
102
-
103
-
104
-
105
-
106
-
107
-
108
-
109
-
110
-
111
-
112
-
113
-
114
-
115
-
116
-
117
-
118
-
119
-
120
-
121
-
122
-
123
-
124
-
125
-
126
-
127
-
128
-
129
-
130
-
131
-
 132
132 -
 133
133 -
 134
134 -
 135
135 -
 136
136 -
 137
137 -
 138
138 -
 139
139 -
 140
140 -
 141
141 -
 142
142 -
143
-
144
-
145
-
146
-
147
-
148
-
149
-
150
-
151
-
152
-
153
-
154
-
155
-
156
-
157
-
158
-
159
-
160
-
161
-
162
-
163
-
164
-
165
-
166
 |
 |