Asus P5AD2-E Premium User Guide - Page 147
Intel, RAID configurations
 |
View all Asus P5AD2-E Premium manuals
Add to My Manuals
Save this manual to your list of manuals |
Page 147 highlights
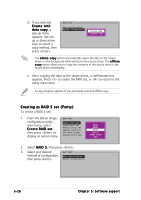
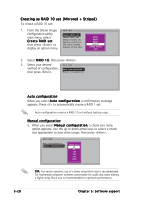
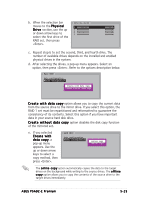
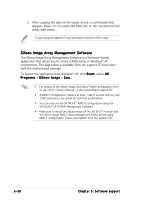
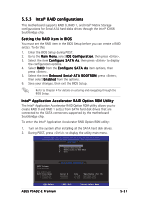
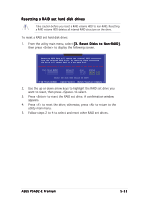
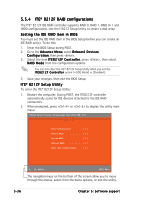
5.5.3 Intel® RAID configurations This motherboard supports RAID 0, RAID 1, and Intel® Matrix Storage configurations for Serial ATA hard disks drives through the Intel® ICH6R Southbridge chip. Setting the RAID item in BIOS You must set the RAID item in the BIOS Setup before you can create a RAID set(s). To do this: 1. Enter the BIOS Setup during POST. 2. Go to the Main Menu, select IDE Configuration, then press . 3. Select the item C o n f i g u r e S A T A A s, then press to display the configuration options. 4. Select R A I D from the C o n f i g u r e S A T A A s item options, then press . 5. Select the item O n b o a r d S e r i a l - A T A B O O T R O M, press , then select E n a b l e d from the options. 6. Save your changes, then exit the BIOS Setup. Refer to Chapter 4 for details on entering and navigating through the BIOS Setup. Intel® Application Accelerator RAID Option ROM Utility The Intel® Application Accelerator RAID Option ROM utility allows you to create RAID 0 and RAID 1 set(s) from SATA hard disk drives that are connected to the SATA connectors supported by the motherboard Southbridge chip. To enter the Intel® Application Accelerator RAID Option ROM utility: 1. Turn on the system after installing all the SATA hard disk drives. 2. During POST, press to display the utility main menu. Intel(R) Application Accelerator RAID Option ROM v4.0.0.6211 Copyright(C) 2003-04 Intel Corporation. All Rights Reserved. [ MAIN MENU ] 1. Create RAID Volume 2. Delete RAID Volume 3. Reset Disks to Non-RAID 4. Exit RAID Volumes: None defined. Non-RAID Disks: Port Drive Model 0 ST380013AS 1 ST380013AS [ DISK/VOLUME INFORMATION ] Serial # xxxxxxxx xxxxxxxx Size 74.5GB 74.5GB Type/Status (Vol ID) Non-RAID Disk Non-RAID Disk [ ]-Select [ESC] Exit [Enter]-Select Menu ASUS P5AD2-E Premium 5-31
-
 1
1 -
2
-
3
-
4
-
5
-
6
-
7
-
8
-
9
-
10
-
11
-
12
-
13
-
14
-
15
-
16
-
17
-
18
-
19
-
20
-
21
-
22
-
23
-
24
-
25
-
26
-
27
-
28
-
29
-
30
-
31
-
32
-
33
-
34
-
35
-
36
-
37
-
38
-
39
-
40
-
41
-
42
-
43
-
44
-
45
-
46
-
47
-
48
-
49
-
50
-
51
-
52
-
53
-
54
-
55
-
56
-
57
-
58
-
59
-
60
-
61
-
62
-
63
-
64
-
65
-
66
-
67
-
68
-
69
-
70
-
71
-
72
-
73
-
74
-
75
-
76
-
77
-
78
-
79
-
80
-
81
-
82
-
83
-
84
-
85
-
86
-
87
-
88
-
89
-
90
-
91
-
92
-
93
-
94
-
95
-
96
-
97
-
98
-
99
-
100
-
101
-
102
-
103
-
104
-
105
-
106
-
107
-
108
-
109
-
110
-
111
-
112
-
113
-
114
-
115
-
116
-
117
-
118
-
119
-
120
-
121
-
122
-
123
-
124
-
125
-
126
-
127
-
128
-
129
-
130
-
131
-
132
-
133
-
134
-
135
-
136
-
137
-
138
-
139
-
140
-
141
-
 142
142 -
 143
143 -
 144
144 -
 145
145 -
 146
146 -
 147
147 -
 148
148 -
 149
149 -
 150
150 -
 151
151 -
 152
152 -
153
-
154
-
155
-
156
-
157
-
158
-
159
-
160
-
161
-
162
-
163
-
164
-
165
-
166
 |
 |