Bosch WTMC5321US Installation and Use & Care (all languages) - Page 16
Caution
 |
UPC - 825225852339
View all Bosch WTMC5321US manuals
Add to My Manuals
Save this manual to your list of manuals |
Page 16 highlights
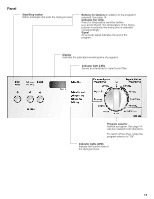
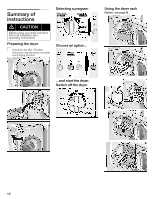
3. Rotate program selector to the desired program. Select the program which corresponds to the laundry in the dryer from the program selection table (see page 15). The dryer light turns on inside the drum. i The Start/Stop" indicator light starts flashing. 4. If required, select Option" by pressing the button. The "Options" are explained on page 14. i The estimated remaining time will be updated. 5. Place laundry in the empty drum. Put each piece of laundry into the machine separately. For best results the laundry to be dried must be sorted according to type of laundry and desired degree of drying. For further information see page 13. i Observe drying symbols of the laundry manufacturer. If drying woolen clothing and shoes, see the information on page 16. Ensure that there is only laundry in the drum. Check that all items are completely in the drum. 6. Close the door. The Start/Stop" indicator light continues flashing. i If the door has not been closed properly, the dryer will not start. 7. Press the Start/Stop" button. The Start/Stop" indicator light illuminates. i The program starts with an acoustic signal (if set). If a standard program has been selected, the indicator lights indicate the progress of the program sequence. i At program end an acoustic signal is emitted (if set) and the LED Wrinkle block" illuminates. i When the drying process is complete (program or selected time program ended), the drum rotates at specific intervals for 1 hour. This prevent the laundry from creasing. The laundry remains loose and fluffy until it is removed. The laundry should be removed before this time has elapsed. 8. Open the door. 9. Take the laundry out of the dryer. 10. Rotate the program selector to Off". The dryer light goes out. 11. Clean the filter. The filter should be cleaned after each drying process. Cleaning the filter reduces the drying time and saves energy. 12. Close the door. Using the dryer rack (Option, see page 8) Use the dryer rack to dry washable woolen textiles (e.g. sweaters) and shoes. The dryer rack remains stationary while the drum rotates. Damp wool should not be moved, as it has a tendency to matt. Drying shoes without a rack could damage the drum. d CAUTION Dry only one item of clothing or one pair of shoes - maximal dry load 2,2 lbs (1 kg)! The laundry must have been spun! Only dry prewashed shoes! The laundry must not touch the drum! It could jam and be damaged. After using the dryer rack, take it out of the dryer immediately. Inserting the dryer rack 1. Open the dryer door. 2. Check that the drum is empty. 3. Remove the lint filter. 16
-
 1
1 -
2
-
3
-
4
-
5
-
6
-
7
-
8
-
9
-
10
-
 11
11 -
 12
12 -
 13
13 -
 14
14 -
 15
15 -
 16
16 -
 17
17 -
 18
18 -
 19
19 -
 20
20 -
 21
21 -
22
-
23
-
24
-
25
-
26
-
27
-
28
-
29
-
30
-
31
-
32
-
33
-
34
-
35
-
36
-
37
-
38
-
39
-
40
-
41
-
42
-
43
-
44
-
45
-
46
-
47
-
48
-
49
-
50
-
51
-
52
-
53
-
54
-
55
-
56
-
57
-
58
-
59
-
60
-
61
-
62
-
63
-
64
-
65
-
66
-
67
-
68
 |
 |
