Brother International BAS-375E Programmer Instruction Manual - English - Page 175
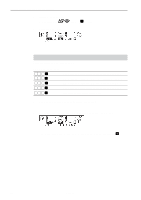
Parallel stitch, Repeat steps 3 and 4 and move the needle to the end point. Input
 |
View all Brother International BAS-375E manuals
Add to My Manuals
Save this manual to your list of manuals |
Page 175 highlights
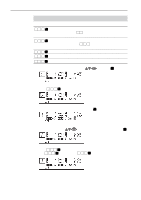
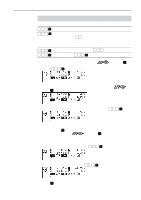
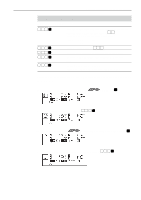
Chapter 3 Programming with Command Function 5. Repeat steps 3 and 4 and move the needle to the end point. Input 11 E. When the alarm sound is complete, the needle point moves to the end position. Parallel stitch Command to be used 3 M M 789L 788L 11 E Creating parallel stitch in the same direction to the sewing path. Input the width of parallel stitch in . Values 1.0 - 9.9 mm are available for the width. Example Width Input 1.5mm 315 Input the stitch length in . Carrying out parallel stitch on the left side to the sewing path. Carrying out parallel stitch on the right side to the sewing path. Starting parallel stitch calculations. (This is the end code. Refer to page 179 for details.) 1. Select the sewing start position with and press L . 2. Determine the width and input 3 M. 3. Move the needle with to select the second point, then press L . 174 Programmer
-
 1
1 -
2
-
3
-
4
-
5
-
6
-
7
-
8
-
9
-
10
-
11
-
12
-
13
-
14
-
15
-
16
-
17
-
18
-
19
-
20
-
21
-
22
-
23
-
24
-
25
-
26
-
27
-
28
-
29
-
30
-
31
-
32
-
33
-
34
-
35
-
36
-
37
-
38
-
39
-
40
-
41
-
42
-
43
-
44
-
45
-
46
-
47
-
48
-
49
-
50
-
51
-
52
-
53
-
54
-
55
-
56
-
57
-
58
-
59
-
60
-
61
-
62
-
63
-
64
-
65
-
66
-
67
-
68
-
69
-
70
-
71
-
72
-
73
-
74
-
75
-
76
-
77
-
78
-
79
-
80
-
81
-
82
-
83
-
84
-
85
-
86
-
87
-
88
-
89
-
90
-
91
-
92
-
93
-
94
-
95
-
96
-
97
-
98
-
99
-
100
-
101
-
102
-
103
-
104
-
105
-
106
-
107
-
108
-
109
-
110
-
111
-
112
-
113
-
114
-
115
-
116
-
117
-
118
-
119
-
120
-
121
-
122
-
123
-
124
-
125
-
126
-
127
-
128
-
129
-
130
-
131
-
132
-
133
-
134
-
135
-
136
-
137
-
138
-
139
-
140
-
141
-
142
-
143
-
144
-
145
-
146
-
147
-
148
-
149
-
150
-
151
-
152
-
153
-
154
-
155
-
156
-
157
-
158
-
159
-
160
-
161
-
162
-
163
-
164
-
165
-
166
-
167
-
168
-
169
-
 170
170 -
 171
171 -
 172
172 -
 173
173 -
 174
174 -
 175
175 -
 176
176 -
 177
177 -
 178
178 -
 179
179 -
 180
180 -
181
-
182
-
183
-
184
-
185
-
186
-
187
-
188
-
189
-
190
-
191
-
192
-
193
-
194
-
195
-
196
-
197
-
198
-
199
-
200
-
201
-
202
-
203
-
204
-
205
-
206
-
207
-
208
-
209
-
210
-
211
-
212
-
213
-
214
-
215
-
216
-
217
-
218
-
219
-
220
-
221
-
222
-
223
-
224
-
225
-
226
 |
 |
