Brother International HL-2170W Quick Setup Guide - English - Page 29
Wireless Setup and Driver Install, Recommended, Automatic install Advanced, Ready - reset
 |
UPC - 012502619468
View all Brother International HL-2170W manuals
Add to My Manuals
Save this manual to your list of manuals |
Page 29 highlights
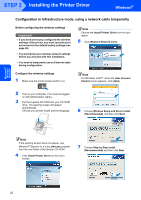
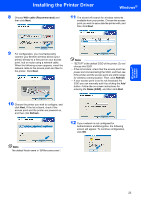
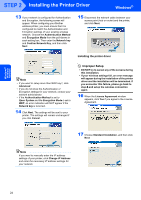
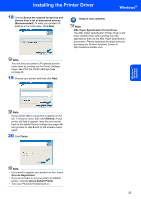
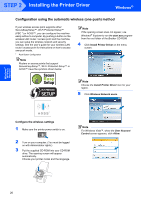
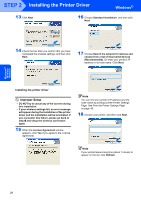
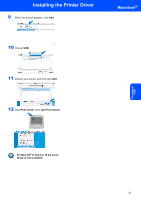
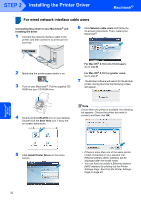
Windows® Wireless Network Installing the Printer Driver Windows® 6 Choose Wireless Setup and Driver Install (Recommended), and then click Next. 7 Choose Automatic install (Advanced) and click Next. 8 Confirm the on-screen message and click Next. 9 Press the wireless setup button located at the back of the machine for less than 2 seconds as show in the illustration below. This will put the printer in one-push wireless setting mode. This feature will automatically detect which mode your access point uses for one-push configuration (SecureEasySetup™, Wi-Fi Protected Setup™ or AOSS™) of your printer. Note • Use a pointy object such as a ballpoint pen to press the button. • If you press the button for 3 seconds or more, the printer will change to the PIN Method of the Wi-Fi Protected Setup™ mode. 10 The printer starts the one-push wireless setting mode. The printer searches for an access point that supports SecureEasySetup™, Wi-Fi Protected Setup™ or AOSS™ for 2 minutes. 11 Put your access point in the SecureEasySetup™ mode, the Wi-Fi Protected Setup™ mode or the AOSS™ mode, depending on what is supported by your access point. Please refer to the instruction manual that came with your access point. 12 Wait for the Ready LED (Go button) of your printer to indicate connection succeeded. The Ready LED will turn on for 5 minutes. (See the table LED indications when using the one-push wireless setting mode on page 8) This indication means the machine has successfully connected to your router or access point. You can now use your printer on the wireless network. If the LED indicates connection failed (See the table LED indications when using the one-push wireless setting mode on page 8), the machine has not successfully connected to your router or access point. Try starting from 9 again. If the same message is indicated again, reset the machine back to the default factory settings and try again. For resetting, see Network default settings on page 46. If the LED indicates session overlap (See the table LED indications when using the one-push wireless setting mode on page 8), the machine has detected more than 2 routers or access points on your network that have the Wi-Fi Protected Setup™ mode or the AOSS™ mode enabled. Make sure that only one router or access point has the Wi-Fi Protected Setup™ mode or the AOSS™ mode enabled and try starting from 9 again. 27
-
 1
1 -
2
-
3
-
4
-
5
-
6
-
7
-
8
-
9
-
10
-
11
-
12
-
13
-
14
-
15
-
16
-
17
-
18
-
19
-
20
-
21
-
22
-
23
-
 24
24 -
 25
25 -
 26
26 -
 27
27 -
 28
28 -
 29
29 -
 30
30 -
 31
31 -
 32
32 -
 33
33 -
 34
34 -
35
-
36
-
37
-
38
-
39
-
40
-
41
-
42
-
43
-
44
-
45
-
46
-
47
-
48
-
49
-
50
-
51
-
52
 |
 |
